
- Contents
- Authentication
- Application Integration
- REST APIs
- Embeds
- Robot Integration
- Robot SDK
- Edge SDK
- Interoperability
- Configuration Management
- Summary
- Using the InOrbit CLI
-
Config API Kinds Reference
- Configuring: Data Sources
- Configuring: Status Definitions
- Configuring: Incident Definitions
- Configuring: Action Definitions
- Configuring: Dashboards
- Conditional functionality
- Configuring: Preferences
- Configuring: Robot Camera
- Configuring: Robot Footprint
- Configuring: Mission Tracking
- Configuring: Mission Definitions
- Configuring: Mission Schedules
- Configuring: KPI Definitions
- Configuring: Spatial Annotations
- Configuring: Traffic Management
- Robot-based Customization
- Concepts
- Expressions Language
- Maps
Contents
InOrbit is a RobOps platform aimed at resolving common infrastructure needs and integrating into the broader robotics solution. Here you can find a menu of the different options you can choose from including SDKs, APIs and tools.

Authentication
All API and SDK access is authenticated with the InOrbit system using an API Key which can be obtained and managed through InOrbit Control, in the API Key section. An API Key is always associated with a service user in your account and its access is managed using role-based access control.
Integrating applications
These are interfaces that allow utilizing robot capabilities in other applications. There are various alternatives that are suitable for different types of applications and technologies.

REST APIs
InOrbit REST APIs are best suited for integrating robot functionality in custom applications and business workflows. They include methods to query online and historical robot data, execute remote actions, organize robots in collections, track ongoing and past mission status, inspect audit logs and more.

Embeds
InOrbit's Embeds make it easy to include pre-made robot-specific UI components into any Web Client application. Through the InOrbit Control, you can configure dashboards with the widgets that you need for specific use cases and then using an embed code, make them available as part of your application, giving you total control of the user experience.
Configuration as Code
InOrbit's Configuration as Code makes it easier to define advanced configuration in a friendly format, thus allowing full control of the application with a refined granularity level.

Incident Management
InOrbit provides different ways to integrate robot monitoring capabilities into your overall incident management workflow. Through the Incident Management interface, it’s possible to dispatch robot alerts in real-time, react to them with context-specific actions from external systems and keep track of ongoing incident updates.
Out-of-the-box integrations with Slack, Google Chat, OpsGenie and PagerDuty can be configured through InOrbit Control and are best suited for standard workflows.
An outgoing Webhook interface and incoming API are available to integrate with additional systems or implement custom integration behaviors. We’ve provided a code sample to make it easier to get started with these APIs.
Integrating robots
InOrbit provides different alternatives to connect your robots. This section will help you select the best option for your use case.

ROS-based agent
If your robot supports ROS, connecting it to InOrbit can be done in less than a minute using our Quickstart installer. From there, you can take control of the customization using a Debian or Docker based installation and/or applying advanced agent settings. You can also use and extend the InOrbit republisher ROS node to be in control of what specific data you want to expose.

Robot SDK
The Robot SDK enables developers to implement bidirectional communication between robots and the cloud using any robotics framework without using ROS. It leverages a stripped down version of the InOrbit agent to manage the communication between your robot and the cloud and provides simplified bindings for popular robot programming languages such as C++.
Edge SDK
The Edge SDK is useful for connecting robots from intermediary applications without requiring the installation of a software agent on individual robots. It provides a set of interfaces using language bindings to connect to the cloud and submit robot data selectively. This SDK is the recommended path for connecting the InOrbit platform through an existing Fleet Manager.

Interoperability standards
If your robot supports the Mass Robotics AMR Interoperability standard, you can connect it to InOrbit without installing any software or building on any SDK. You can configure and get the endpoint URL through InOrbit Control. VDA-5050 compliant robots can be connected to InOrbit using the VDA-5050 to InOrbit Proxy. You can also find some open source tools and code samples to ease the implementation of interoperability standards on the robot side in our public GitHub organization.
Tools and samples
-
The Google Chat Incident Management sample shows how to connect the InOrbit Incident Management webhook to dispatch alerts into a third-party system.
-
This Brickmart Executive Page shows how to use Embeds on a static site. You can see it live here
-
The ros_amr_interop repository brings together resources to help with the adoption of interoperability standards. It includes the massrobotics_amr_sender_py package, which allows you to make a ROS 2 robot compatible with the standard using only configuration.
-
The VDA5050 to InOrbit Proxy is a useful starting point for connecting VDA-5050 compliant devices to InOrbit and it also doubles as a sample code and starting point for using the InOrbit Edge SDK.
-
The ros_inorbit_samples repository provides code samples to make it easier to customize the integration of ROS robots with InOrbit. It includes the inorbit_republisher allowing you to use configuration to manage what data is published to InOrbit, and is available for ROS Melodic and Noetic.
Here are some open source code samples and tools to make it easier to integrate and manage robots:
Authentication
InOrbit uses API keys to authenticate API requests, use of Embeds and calls from the Edge SDK. An API key identifies your account’s service user. This key provides security so that no one outside of your account can access your data.
To generate your API Key go to InOrbit Control, go to Settings, Admin section and open the API Keys tab. Here you’ll be able to create a new API Key for your account.
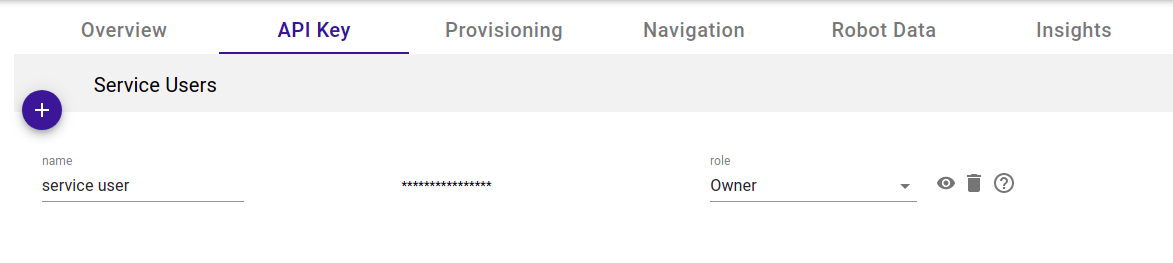
On this tab you are able to create, rename and delete one or more API Keys.
- To create an API Key, click on the + icon and update the values of the newest row.
- To delete an API Key, click on the trashcan icon and the key will be removed.
- To update an API Key, update the values in the editable inputs, the changes will be automatically saved.
- Click on the eye icon to view the API Key.
With the creation of a new API Key, InOrbit will create a new user named Service user. This user will be linked to the newly created API Key and when the key is used, the actions are logged under Service user. However, you can change this name at any time by updating the "name" input of a user on the API Key tab in the InOrbit Console.
Restricting API requests: To control API access for users in the account, update the role of the user by using the role selector in the API Key tab in the InOrbit Console.
Application Integration
This section describes different ways to integrate InOrbit and third-party applications, including the use of REST APIs and Embeds.
InOrbit REST APIs: provide programmatic access to InOrbit's functionality and are best suited for integrating with backend services.
Embeds: allow developers to build and embed dashboards containing robot or fleet level information into any applications using no-code.
Configuration as Code: allow customers to configure all InOrbit settings using code.
The following sections describe REST APIs, Embeds, and Configuration as Code in detail.
REST APIs
InOrbit offers REST and streaming APIs that enable programmatic access to InOrbit features. Using these APIs you can fetch data related to your robots, trigger actions, integrate with incident management systems and more.
- Robots
- Collections & Tags
- Attributes
- Localization & Maps
- Navigation
- Robot Lock
- Actions
- Incidents
- Mission Tracking
- Push APIs
- Advanced Settings
- Audit Logs
Check the APIs' documentation and specs here
Embeds
InOrbit Embeds allows you to create a dashboard from InOrbit Console and embed it in any application. Leveraging Embeds you can show robot or fleet level information in your applications without having to implement the UI from scratch.
Some example use cases include:
- Dedicated role based experience on a tablet for a Floor Operator
- White-labeled end-user portal
- Unattended team dashboard running on a centralized monitor
- UI running on your robot’s physical screen to trigger actions
Defining an Embed
Embeds are created by defining a dashboard from the Console and then generating the embedding code for it.
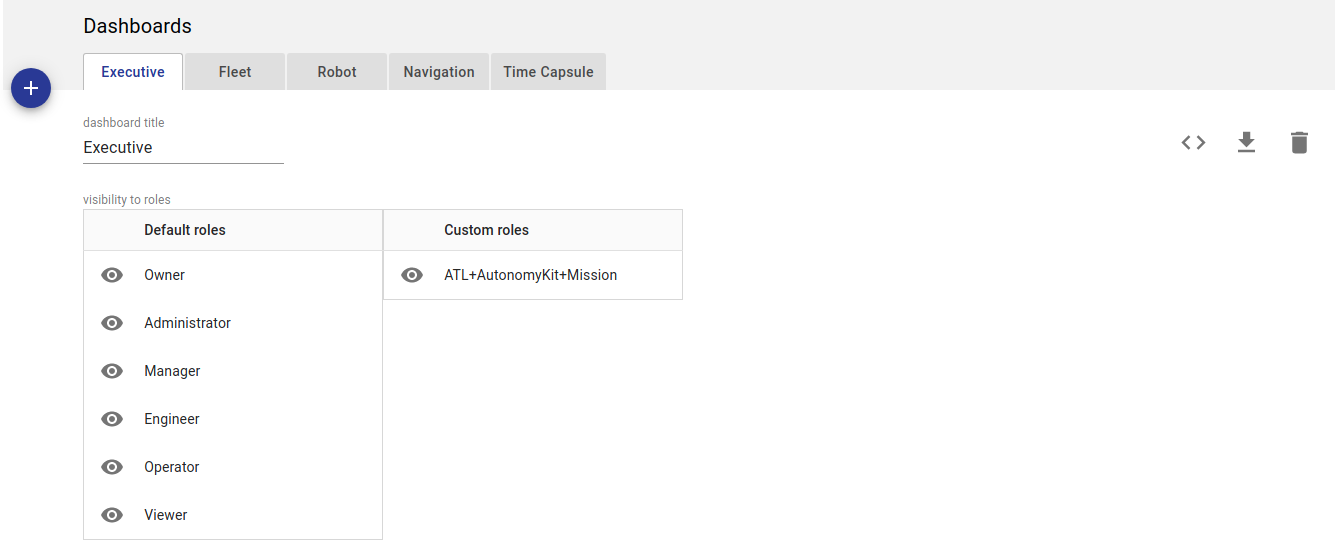
To manage your dashboards go to Robot Data → Dashboards. From there you can create and edit dashboards, including setting visibility rules and modifying sections and widgets. As shown in the following image:

Using the gray plus sign you can add new sections. Each section has a name and scope, that can be robot or fleet.

Using the gray plus sign inside the section you can add widgets from the widgets palette, as shown below:

Once you have defined the dashboard, you are ready to embed it into your applications.
Using an Embed in your application
To generate the embedding code, go to InOrbit Control > Settings > Robot Data tab > Dashboards section and use the “< >” button on the right, near the top.
Clicking this button shows a code fragment that can be used to embed the dashboard into any HTML page.
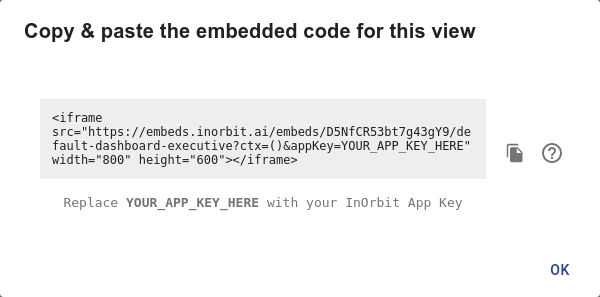
You can customize the iframe’s properties to match your application layout. Remember to replace YOUR_APP_KEY_HERE with your InOrbit API Key.
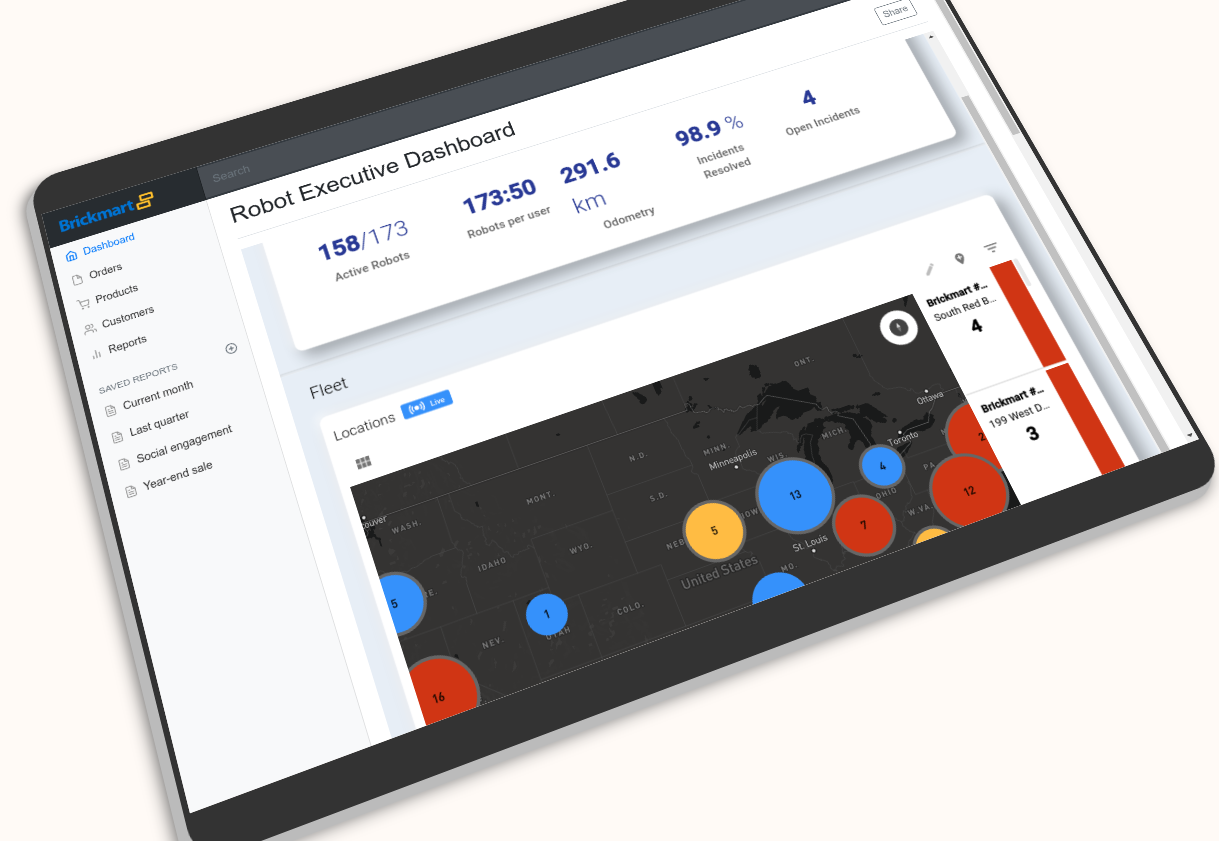
The following image shows how an Embed looks as part of a web application from a fictional company named Brickmart:
Robot Integration
This section describes tools and libraries that can be used to connect robots to InOrbit. The connection can be made from the individual robots or from servers running on the edge.
Depending on the selected solution architecture, you can pick one of the following SDKs:
- Robot SDK helps developers implement a bidirectional communication channel between robots and InOrbit. It can be used to feed robot data into InOrbit and then implement actions, such as teleoperation and more. The Robot SDK also streamlines integration with ROS and ROS2 by allowing developers to map ROS topics to InOrbit using simple configuration files.
- Edge SDK simplifies the integration with third-party or custom applications, like fleet managers, or warehouse management systems. It can be used to fed data gathered by edge servers into InOrbit.
The following sections describe both SDKs in detail and provides examples of their usage.
Robot SDK
The Robot SDK enables developers to implement bidirectional communication between robots and the cloud. It leverages the InOrbit Agent Core that implements the core communication mechanism in an efficient and secure way. Particularly the agent takes care of:
- Adaptive sampling & throttling
- Connection handling & offline buffering
- Security / Encryption
- Scripted actions
- Video processing
The Robot SDK provides various methods to ease communication between the agent and other software running on your robot, including:
- Language Bindings: High-level language-specific APIs that communicate with the agent. Libraries for two languages are available: the Robot SDK for C++ and the Robot SDK for Python.
- Helper components: reduce integration friction with ROS-based robots, but providing zero-code integration mappings from ROS topics.
The following diagram shows how the InOrbit agent interfaces with other software running on the robot:

Software on the robot can communicate with the agent using various mechanisms, depending on the chosen software stack.
How to integrate with custom code
How To Integrate With Custom Code - C++ example
#include "robot-sdk-cpp/include/inorbit/inorbit.hpp"
int main() {
 // Create an InOrbitSDK object
 inorbit::InOrbitSDK sdk;

 // Publish custom data
 sdk.sendKeyValue("battery", 0.56);

 // Publish the pose
 double location[] = {5, 4, 0};
 double rotation_quaternion[] = {0, 0, -0.131, 0.991};
 sdk.sendPose("my_reference_frame", location, rotation_quaternion);
 return 0;
}
How To Integrate With Custom Code - Python example
from inorbit.robot_sdk import LaserConfig
from inorbit.robot_sdk.robot import RobotSession
from math import inf

robot_session = RobotSession()

# Publish sample key-value pairs
robot_session.publish_key_values({"battery": 0.56})

# Publish a sample pose
robot_session.publish_pose({"x": 0.0, "y": 1.1, "yaw": 0.0})

# Set configurations parameters for a single lidar
laser_config = LaserConfig(
    x=0,
    y=0,
    yaw=0,
    angle=(-0.5, 0.5),
    range=(2.0, 10),
    n_points=10,
)
robot_session.register_lasers([laser_config])

# Publish readings for a lidar
lidar = [3.1, 3.3, inf, 5.3, 8.1, inf, 2.0, 5.5, 3.8]
robot_session.publish_lasers([lidar])
The Robot SDK integrates with both C++ and Python codebases. Available as a C++11 header-only library or a Python package it serves as a wrapper for communicating with the InOrbit Agent Core. The libraries can be downloaded from the Robot SDK for C++ or the Robot SDK for Python. Please note that the SDK is designed to work with the InOrbit Agent Core; refer to the Agent Core Installation section for installation instructions.
For more detailed examples, please refer to the corresponding Robot SDK repository.
Agent Core installation
To integrate from C++ or Python you must use the InOrbit Agent Core. It can be installed in different ways, including via a Debian package. For simplicity in this documentation a one-line command that downloads and executes the agent installer is used. After installing the agent you’ll be able to start seeing data from your robot, such as CPU usage, when using InOrbit.
As a prerequisite you’ll have to fetch your account key to add a robot to InOrbit. You can get the key from InOrbit Control in the “Add Robot” butto page as shown in the next image:

Your account key is the last segment of the URL, A9wXdA5dsD5 in this screenshot. Take note of it since you’ll need it for the next step.
Run the following one-line command on your robot to install the agent, remember to replace
${YOUR_ACCOUNT_KEY}with the key you obtained in the previous step:
curl "https://control.inorbit.ai/liftoff/${YOUR_ACCOUNT_KEY}?variant=core" | sh
Executing the command will trigger the agent installation process, follow its steps to get the agent running on your robot.
After completing the installation, the agent will automatically start and connect to InOrbit. By default the robot name is its “hostname”.
To be sure that everything is configured correctly you can try the following command to check that the agent is up and running:
curl http://localhost:5000
Executing the above should produce the following output:
“InOrbit Agent API: OK”.
If for some reason you don't see your robot connected or reporting data, check the agent logs at ~/.inorbit/local/inorbit_agent.log. You are welcome to contact our Support Team if you need additional help fixing the problem.
You can customize the port and binding address used by the agent by editing ~/.inorbit/local/agent.env.sh and setting the following variables:
INORBIT_AGENT_API_PORT: Port used by the agent to listen for connections from the SDK, default values is 5000.INORBIT_AGENT_API_BINDING: Address used by the agent to listen for connections from the SDK, default value is “localhost”.
Installing the C++ library
You can use the following command to include the library in your project as a git-submodule:
git submodule add https://github.com/inorbit-ai/robot-sdk-cpp.git robot-sdk-cpp
This command will create a new directory named robot-sdk-cpp containing the C++ library.
The InOrbit Robot SDK C++ Library is a header-only C++11 library that encapsulates the communication between C++ programs and the InOrbit agent. It is licensed under the MIT license.
Depending on your preferences, you can add the library to your project in a few different ways. The recommended way, if you are already using Git, is to use git-submodules to include the library's repository in your project. Another option is to just grab the files from the repository and copy them into your project.
Note that if you prefer you can download the library from its repository at GitHub.
Publishing data from C++
#include "robot-sdk-cpp/include/inorbit/inorbit.hpp"
int main() {
  // Create an InOrbitSDK object
  inorbit::InOrbitSDK sdk;
  return 0;
}
All the functionality provided by the SDK library is encapsulated in a class called inorbit::InOrbitSDK, so the first steps to communicate with the InOrbit agent is to include the library and then create an object of this class. This is shown in the code block on the right:
This code includes the library, added to the project in the previous section, and creates the sdk object.
By default the sdk object will talk to the agent using TCP, targeting localhost on port 5000. These and other parameters can be changed using more verbose versions of the constructor.
InOrbitSDK(const std::string &agent_host, int agent_port, bool log_errors);
Using this constructor, you can set the agent host, port and if errors should be reported on stderr (default is true).
The sdk object created in the previous step has a sendPose method that you can use to publish poses data from your program. It receives the reference frame, the robot position and its orientation as a quaternion.
Note that InOrbit uses the Right-hand rule to define the axes and rotation ordering, with X representing the forward direction and Y representing a direction towards the left of the robot. The SDK also uses the XYZW notation for quaternions. So, if you are using a different convention for your localization data, you must apply a conversion before calling sendPose.
#include "robot-sdk-cpp/include/inorbit/inorbit.hpp"
int main() {
 // Create an InOrbitSDK object
 inorbit::InOrbitSDK sdk;

 // Publish the pose
 double location[] = {5, 1, 0};
 double rotation_quaternion[] = {0, 0, 0.383, 0.924};
 sdk.sendPose("map", location, rotation_quaternion);
 return 0;
}
The example on the right shows how you can publish a pose to InOrbit:
The code reports the robot pose as being at x = 5, y = 1, z = 0 with a yaw of 45 degrees counterclockwise in the map reference frame.
The sdk object also provides a sendKeyValue method that you can use to publish almost any data value from your program. You can use this method for different data types, including double, integer and strings.
The example on the right shows how you can publish different values to InOrbit:
#include "robot-sdk-cpp/include/inorbit/inorbit.hpp"
int main() {
 // Create an InOrbitSDK object
 inorbit::InOrbitSDK sdk;

 // Publish custom data of different types: string, double, integer
 sdk.sendKeyValue("battery", 0.56);
 sdk.sendKeyValue("pending_tasks", 4);
 sdk.sendKeyValue("serial", "dd2bc73b");

 return 0;
}
This code publishes the battery level, number of pending tasks and the serial number of the robot. The reported data can be queried using APIs or be visualized from InOrbit Control.
Integrating with ROS 1
The InOrbit agent includes native support for ROS, using the publish/subscribe communication mechanism to exchange data with other software running on your robot. The agent automatically detects topics about maps, cameras and more. You can fine tune this configuration from InOrbit Control.
Publishing Custom Data
rostopic pub /inorbit/custom_data/0 std_msgs/String "battery=55"
rostopic pub /inorbit/custom_data/0 std_msgs/String "status=docked"
The SDK custom data mechanism, allows you to publish telemetry data, static/semi-static robot attributes, and events from your robot to InOrbit.
You can publish any string data to /inorbit/custom_data/0 to send it to InOrbit. You can easily send different elements by publishing a key-value pair either by writing a custom node or by leveraging InOrbit's configuration-based republisher node.
The example on the right shows how to publish some values.
Installing and configuring the InOrbit republisher
republishers:
  - topic: "/mission_data"
    msg_type: "my_custom_msgs/MissionData"
    mappings:
    - field: "goal_id.stamp"
      out:
        topic: "/inorbit/custom_data/0"
        key: "mission_status_goal_timestamp"
    - field: "status"
      out:
        topic: "/inorbit/custom_data/0"
        key: "mission_status"
  - topic: "/errors"
    msg_type: "my_custom_msgs/CustomError"
    mappings:
    - field: "error"
      out:
        topic: "/inorbit/custom_data/0"
        key: "error_code"
    - field: "error_message"
      out:
        topic: "/inorbit/custom_data/0"
        key: "error_string"
The node republisher can be installed like any other standard ROS package e.g. for noetic you'd need to install ros-noetic-inorbit-republisher. To illustrate how to use it, let's assume you want to publish data from a complex custom message my_custom_msgs/ComplexCustomMessage.
The InOrbit republisher configuration shown on the right creates the required publishers and subscribers in order to send the data to InOrbit. To see all the possible parameters, please refer to InOrbit's configuration-based republisher node.
The messages that will arrive at InOrbit read:
Two key-value messages for each message on the topic
/mission_data:mission_status_goal_timestamp=123456789mission_status="ok"
Two key-value messages for each message on the topic
/errors:error_code=9error_string="something went wrong"
Running the InOrbit republisher
This node can be executed by using the roslaunch tool and a ROS launchfile pointing to the republisher configuration file, as shown in the example.
<launch>
  <node name="inorbit_republisher" pkg="inorbit_republisher" type="republisher.py">
    <param name="config" textfile="/path/to/config.yaml" />
  </node>
</launch>
Integrating with ROS 2
The InOrbit agent includes support for ROS 2, using the publish/subscribe communication mechanism to exchange data with other software running on your robot.
Edge SDK
The Edge SDK can be used to build integrations between third-party or custom applications running on the edge and the InOrbit platform. For example, it can be used to feed data from a fleet manager system into InOrbit, without requiring the installation of software on your individual robots.
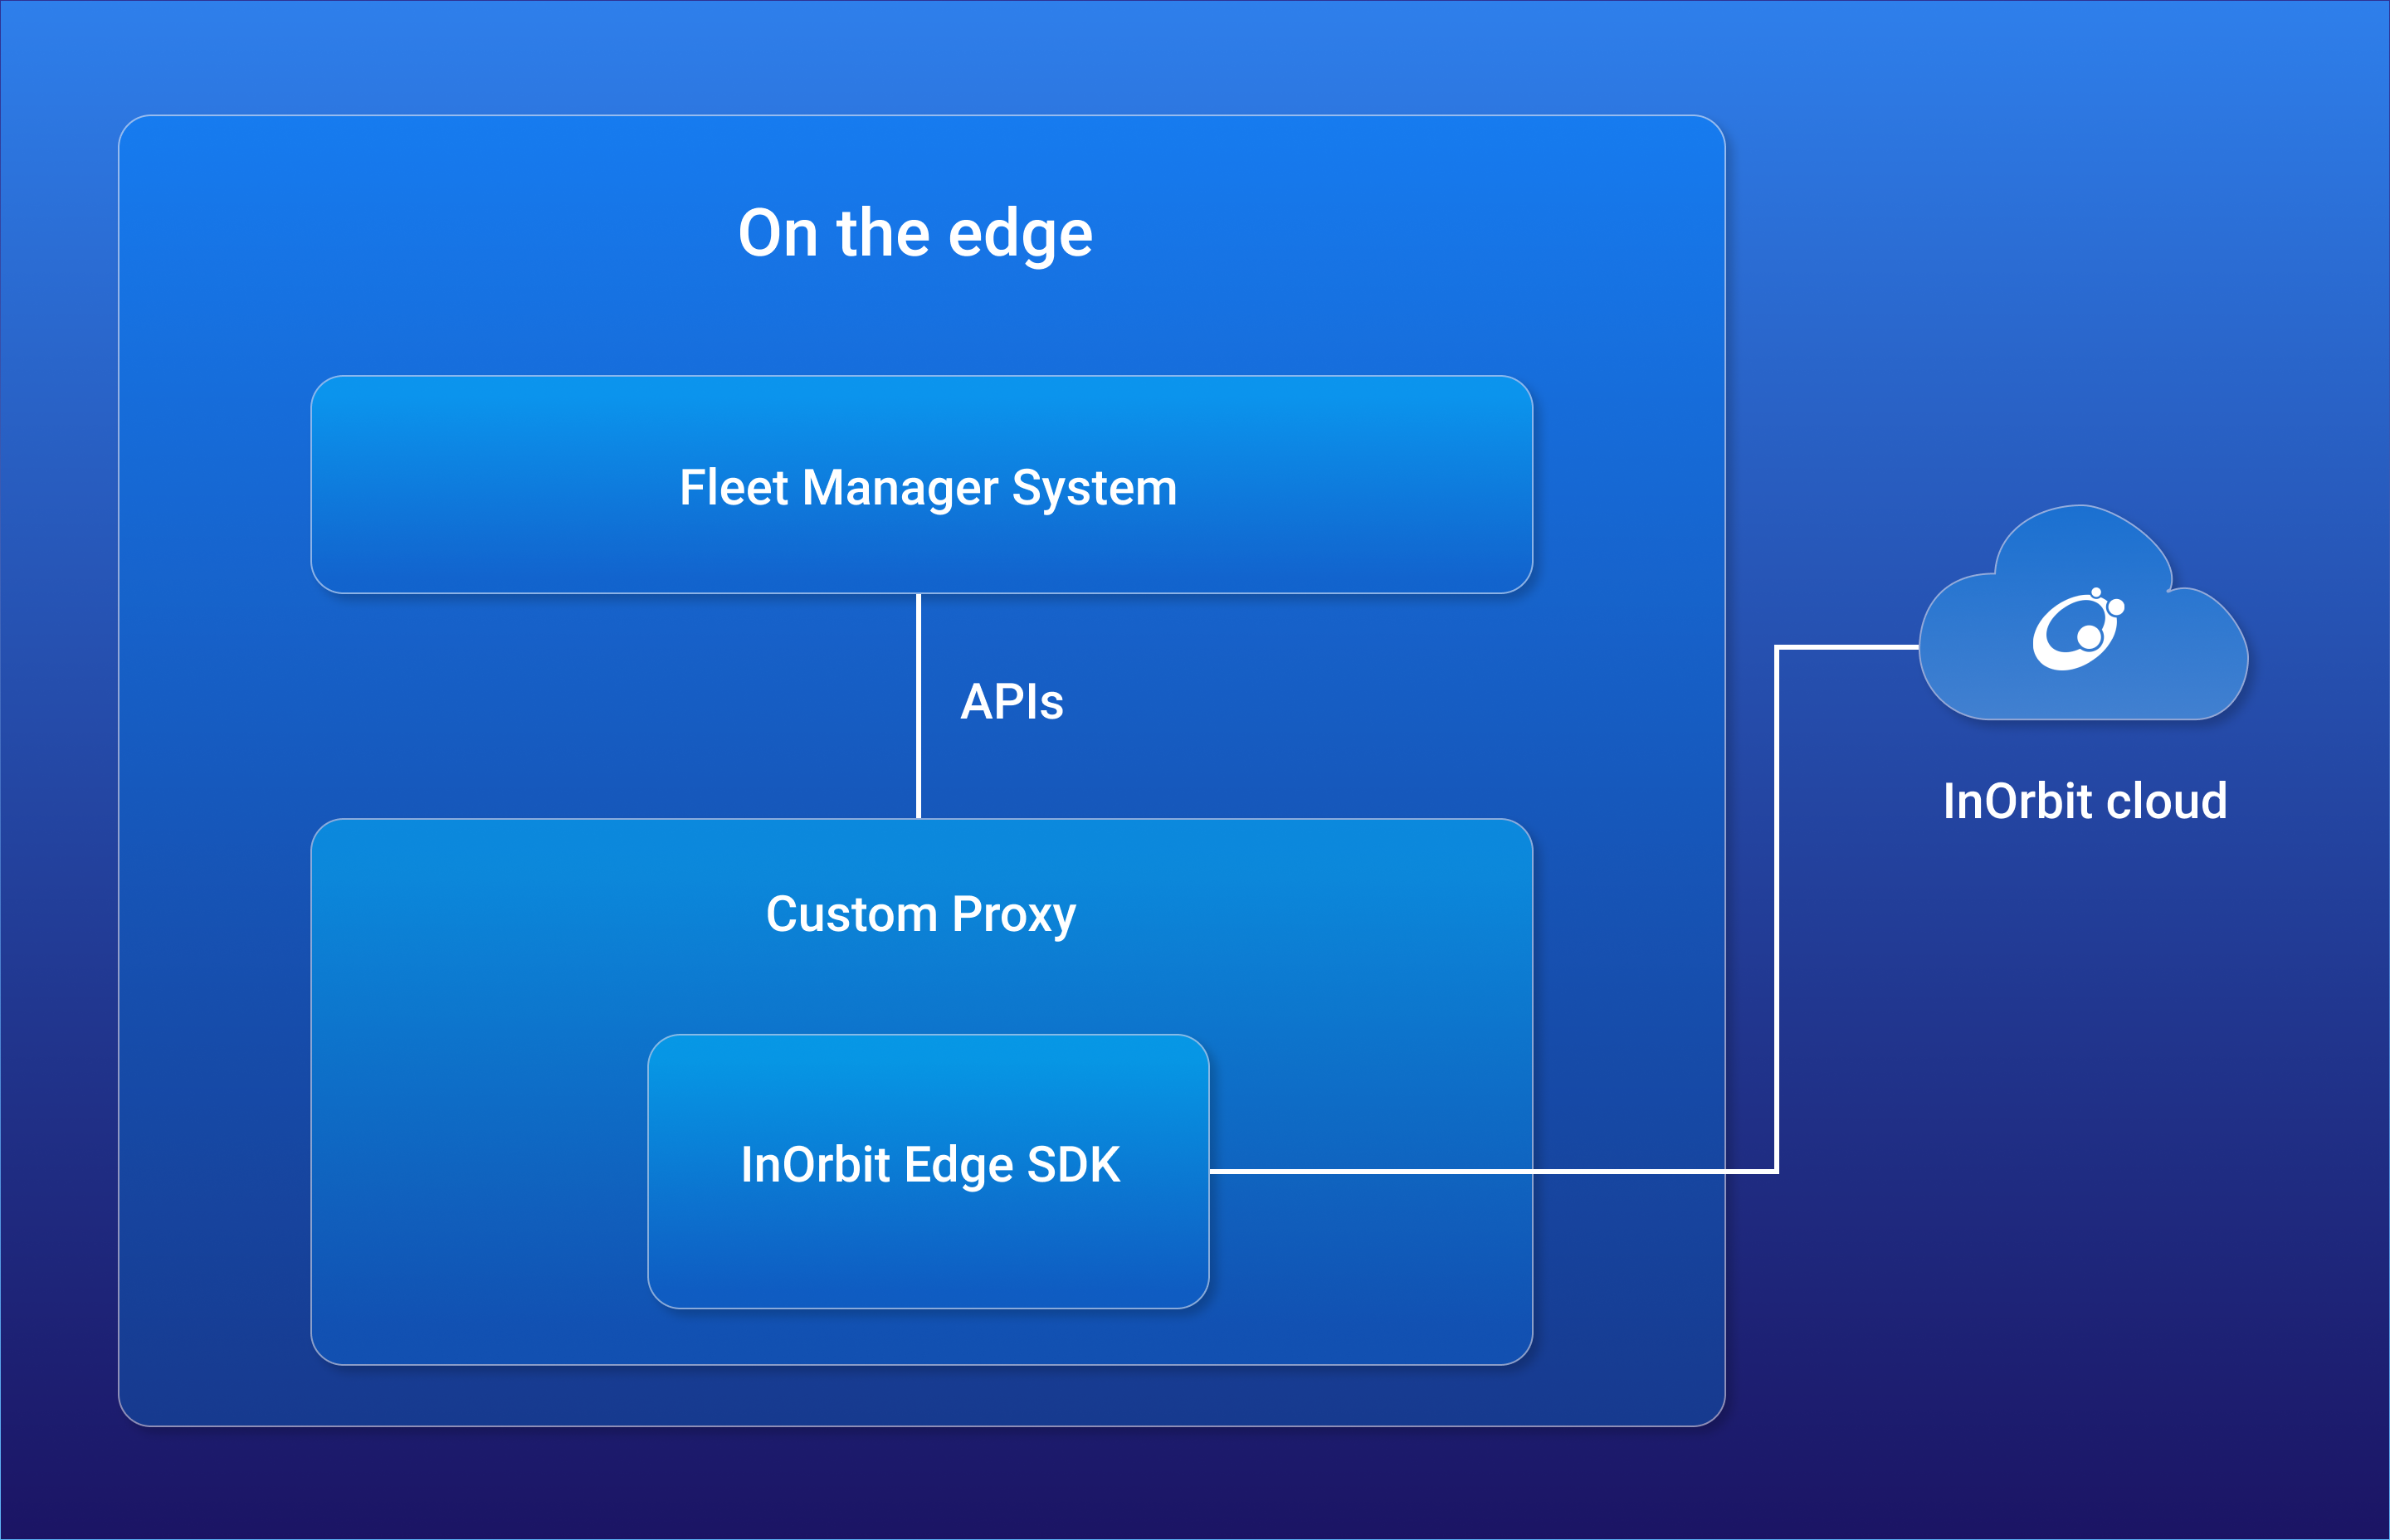
Here a custom component acts as a proxy between the fleet manager system and InOrbit cloud using the Edge SDK.
Any data fed into InOrbit can then be used and queried from other components, like InOrbit Control or REST APIs. This SDK allows the publishing of data related to multiple robots, including their connection state, odometry, poses and any custom attributes you’d like to track.
The Edge SDK is distributed two ways. As an NPM package, which can be run in Javascript and Typescript projects, and as a Python package which is used in Python programs, such as connectors.
Installation
For the most up-to-date installation instrutions, please visit our Github repos for the Javascript Edge SDK or Python Edge SDK. The following example is for Javascript.
npm install inorbit@edge-sdk
The Edge SDK can be installed using NPM. This adds the edge-sdk package as a dependency of your project.
Using the SDK
This section explains how to initialize the Edge SDK and publish data to InOrbit. As a prerequisite you should have already installed the npm package and obtained your InOrbit API key.
Initialization
import { InOrbit } from '@inorbit/edge-sdk';

const sdk = new InOrbit({ appKey: "YOUR_INORBIT_APP_KEY" });
The first step is to import the edge-sdk package. Then initialize the SDK by creating an InOrbit object. The SDK can then be used to publish robot related data to InOrbit.
Reporting robot connection status
The sdk object can be used to report the connection status of each robot to InOrbit. In order to do this, you need to know the IDs of your robots and use the connectRobot and disconnectRobot methods.
const robotId = '12345';
await sdk.connectRobot({ robotId, name: 'MyRobot' });

// Perform tasks

await sdk.disconnectRobot(robotId);
The code reports the robot with id 12345 as connected and then as disconnected. Note that when a robot is reported as online, you can also optionally report its name.
The following sections show how data can be published. Note that the robot must be reported as “online” before publishing any data.
Publishing poses
await sdk.publishPose(robotId, {
  ts: new Date().getTime(),
  x: 5,
  y: 3,
  yaw: 0,
  frameId: 'map'
});
To report a time stamped pose to InOrbit, the publishPose method can be used. The code here reports that the robot is currently at the position (5, 3) in the map reference frame.
Publishing odometry
await sdk.publishOdometry(robotId, {
  tsStart: new Date().getTime(),
  ts: new Date().getTime(),
  speed: {
    linear: 10,
    angular: 1
  }
});
The publishOdometry method can be used to report odometry data to InOrbit. This code reports that the robot is moving with a linear speed of 10 m/s and an angular speed of 1 rad/s.
Publishing other attributes
const robotId = '12345';
await sdk.publishCustomDataKV(robotId, {
  battery: 60,
  status: 'Idle'
});
Other custom attribute can also be reported using the publishCustomDataKV method. The code here reports two custom attributes, battery and status.
Building a Connector
A typical application of the Edge SDK is a program in the structure of a connector. A connector is a custom component that connects a third-party system to InOrbit. The open source Python package inorbit-connector provides a framework for building connectors using the Edge SDK. A simple example can be found in the package's GitHub repostory.
An example of a connector based on inorbit-connector is the SICK Tag-LOC InOrbit Connector, which enables real-time location tracking of objects and vehicles.
Final Notes
Using the Edge SDK allows you to feed data from multiple robots into InOrbit. Contact us if you need help to use this SDK, integrate it with your software or generate your robot IDs.
Complete examples about using the Edge SDK to publish data from multiple robots to InOrbit can be found at:
Interoperability
This section details the different solutions provided by InOrbit Platform to work with robot interoperability standards, such as VDA 5050 and MassRobotics AMR interoperability. These standards are useful to orchestrate heterogeneous fleets that mix robots from different vendors.
Companies that use robots can leverage InOrbit Platform to connect standards compliant robots to the cloud without having to set up dedicated infrastructure. It’s also possible to connect robots that use different standards and orchestrate them in a homogeneous way using InOrbit’s UI and/or APIs.
Robot makers can also benefit from InOrbit Platform by using its open source packages to make any robot standard compliant using just configuration files.
The following sections detail the different interoperability options and solutions included in InOrbit Platform for different standards.
MassRobotics AMR Interoperability
The MassRobotics AMR Interoperability Standard allows AMRs from different vendors to publish information about their state, location, velocity, health, etc using a well defined set of messages. Data transmission is done over web sockets.
Robots compliant with this standard can be connected to InOrbit without requiring the installation of the InOrbit agent on them. ROS2 based robots can become compliant with the standard using the massrobotics_amr_sender package.
Connecting robots to InOrbit
Standard compliant robots can be connected to InOrbit without requiring the installation of the InOrbit agent. To do so, you have to configure your robots to point to InOrbit’s receiver.
You can find the receiver URL for your account in the Console, under Admin → Interoperability.
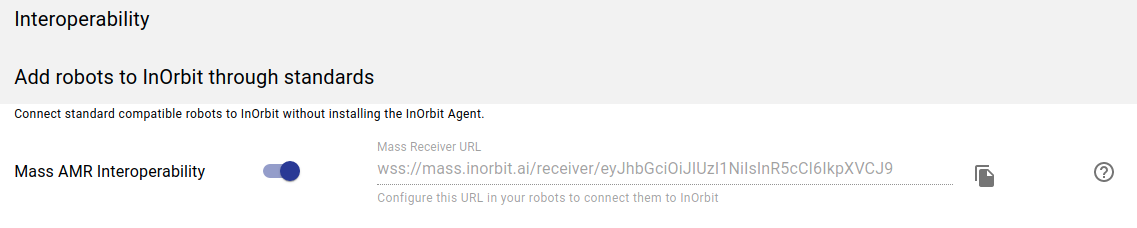
The next step is to configure the receiver URL on your robots to start sending data to InOrbit. The details about this step depend on your specific robot model and software.
Making ROS2 robots compliant with the standard
Using the open source massrobotics_amr_sender ROS package, ROS2 based robots can become compliant with the standard using just configuration files. Check the package documentation for more details and examples.
VDA 5050
The VDA 5050 V 1.1. AGV Communication Interface describes the communication interface for exchanging order and status data between a central master control and automated guided vehicles (AGV).
You can leverage InOrbit Platform infrastructure to provision the required components, including the MQTT broker, and connect your VDA 5050 compliant robots to the cloud.
Contact our support team for more information.
Open-RMF
Open-RMF (Open Robotics Middleware Framework) is a free, open source, modular software system that enables sharing and interoperability between multiple fleets of robots and physical infrastructure, like doors, elevators and building management systems.
InOrbit provides an open source full control fleet adapter for RMF, which enables communication between a fleet of robots controlled by InOrbit and RMF core, allowing centralized coordination and traffic control for a fleet of robots from multiple vendors.
InOrbit's support for RMF makes it possible to use Open-RMF's traffic deconfliction and task-management capabilities while leveraging InOrbit's ability to observe and operate a large variety of robot vendors. Open-RMF and the fleet adapter can be hosted locally or on the cloud.
Check out the RMF InOrbit Examples repository for demos and templates that make it easier to get started with the adapter.
Configuration Management
Basic configuration can be handled through InOrbit Control. For more advanced configuration that also unlocks other benefits, it is recommended to use Configuration as Code. Configuration as Code allows you to customize different InOrbit settings using code. This way you can manage your settings using DevOps best practices and handle complex configurations in an efficient and programmatic way.
Configurations can be coded using JSON and then be managed using InOrbit's command-line
interface (CLI) or through REST APIs. The CLI is distributed as a python package and can be installed through pip.
Additionally, using configuration as code offers the following advantages:
- Version control of changes
- Workflows: PR, review, approve, traceability
- CI/CD
- Reusable and reproducible configurations
- Rollback of changes
- Security
- Auditing
- Software parametrization
Summary
InOrbit's configuration as code mechanism is built around the concept of configuration objects. These objects and their properties set how InOrbit and your robots must behave. For example a configuration object can define Incident rules.
{
    "kind": "<configuration_kind>",
    "apiVersion": "<api_version>",
    "metadata": {
        "id": "<configuration_id>",
        "scope": "<scope>"
    },
    "spec": {
        "someProperty": "someValue",
        "anotherProperty": "anotherValue",
    }
}
Each configuration object has the following general properties:
- kind: Type of setting this configuration refers to, for example Incident. The supported kinds are described later in this document.
- scope: The scope for which this configuration applies.
- apiVersion: current API version.
- spec: configuration values.
On the right you can see the schema in JSON format.
As stated above, each configuration object applies to a specific scope, currently the following levels of scope are supported:
root: This is a system-wide level with default configurations.account: Applies to the whole account. Can be specified usingaccountoraccount/<ACCOUNT_ID>.tag: Applies only to robots tagged with a specific tag. Can be specified usingtag/<ACCOUNT_ID>/<TAG_ID>.robot: Applies only to a specific robots. Can be specified usingrobot/<ACCOUNT_ID>/<ROBOT_ID>.
Scopes behave like a hierarchy, each level inherits the values from its parent and can override them or suppress them.
Suppress means that the configuration object must not be inherited from top levels for the specified
scope. This is done by setting the spec to null.
Using the InOrbit CLI
This section explains how to install and configure InOrbit's CLI. The CLI allows you to apply, list, and clear configurations. There are two methods for installing the CLI. The prerequisite is having either Python 3 or Docker installed, depending on installation method.
Using the InOrbit CLI with Docker
The InOrbit CLI is distributed in a Docker image which is available on DockerHub. To run the container, follow the commands on the right:
export INORBIT_CLI_API_KEY="account_api_key"
docker run -e INORBIT_CLI_API_KEY=$INORBIT_CLI_API_KEY -v $(pwd):$(pwd) -ti inorbitai/cli
Note: It is possible to mount a volume with all configuration files inside the container to make editing and applying them easier. This example uses the current working directory.
Installing the Package
The other method is to install the official Python package from PyPi.
pip install inorbit-cli
The inorbit-cli package.
can be installed using pip by running the command on the right.
Configuring Environment Variables
# Example configuration of environment variables for the CLI
export INORBIT_CLI_API_KEY="account_api_key"
export INORBIT_CLI_VERBOSE="true" #optional
Before using the CLI, you'll need to configure the INORBIT_CLI_API_KEY with your API key.
You can get the API key from
InOrbit Control > Settings > Admin section > API Keys tab.
The CLI verbose mode can be enabled by setting the INORBIT_CLI_VERBOSE environment variable to true.
Getting Started with the CLI
By typing the inorbit or inorbit --help command, you will find the CLI's help shown below.
The CLI provides the following main commands:
apply: Applies a configuration object.delete: Deletes a configuration object.get: Lists or dumps configuration objects.describe: Get detailed information about configuration objects.
Listing Tags and Robots
# Example output -> Collections
Collection 'Location' has 2 tags
==========  ========
tag name    tag id
==========  ========
HQ          hq
Lab         lab
==========  ========

# Example output -> Robots
name                 id  agent version    online    last seen
------------  ---------  ---------------  --------  --------------------------
Inorbito      foo        4.4.0            False     1970-01-01T00:00:00.000001

# Example output -> Tags
name               description                     collection id    collection name
-----------------  ------------------------------  ---------------  -----------------
hardware-problems  Marked with hardware problems.  tags             Other
HQ                 Headquarters.                   location         Location
To learn more about your entities, just run the inorbit describe <entity> command.
You can query the following entities:
- collections: Describe all collections and detailed collection data.
- robots: Describe all robots and detailed robot data.
- tags: Describe all tags and detailed tag data.
Applying a Configuration Object
The apply command can be used to create or update configuration objects. To apply a configuration object follow these steps:
Create a JSON file describing the configuration object. (The reference schemas for the different kinds are described in following sections)
Run
inorbit apply -f config_file.json. If everything goes well, you'll a message likeConfiguration <config/file/path> applied successfully.You can use
inorbit get config --scope "<scope>" --kind "<kind>" "<object_id>" --dumpto check that the configuration object was correctly saved in InOrbit.
Refer to the advanced configuration section for a detailed documentation on how to use scopes.
The kind includes statuses, incident definition, etc. Find their reference in the following sections.
Deleting a Configuration Object
To delete a configuration object, run inorbit delete config --kind "<kind>" "<object_id>" --scope "<scope>".
You will receive an ok response if the configuration object was successfully deleted.
To make sure that the configuration object was deleted, run
inorbit get config --scope "<scope>" --kind "<kind>" "<object_id>" and check that there are no results.
Listing Configuration Objects
Example listing of all config objects of a given kind
$ inorbit get config --scope "*" --kind "Kind"
id                kind                label       scope                      suppressed
----------------  ------------------  -------     -------------------------  ------------
foo               Kind                Battery     account/bar                False
bar               Kind                Other Label tag/baz/qux                False
baz               Kind                            robot/qux/quux             True
Example: Detailed JSON dump of all
IncidentDefinitionobjects applying to the entire account
$ inorbit get config --scope "tag/foo/bar" --kind "IncidentDefinition" --dump
[
  {
    "metadata": {
      "scope": "tag/foo/bar",
      "id": "bar"
    },
    "apiVersion": "v0.1",
    "spec": {

    },
    "kind": "IncidentDefinition"
  }
]
The CLI can query and list any kind of configuration objects using: inorbit get config --scope "<scope>" --kind "<kind>".
The --dump option can also be used to dump the contents (in JSON form) of the objects instead of just listing them.
Note that by default the operation lists any configuration object defined for the account, but system
defaults are hidden. They can be included adding the --include-system-defaults option.
Advanced: Configuration Scopes
The Config API supports different kinds of objects to configure: for example Actions, Statuses or Incidents.
Normally, these configurations are applied account-wide, meaning that every robot in the account's fleet will make use of the configured objects. This is the case for all configurations applied in the Settings section of the app (unless otherwise stated).
As the robot fleets grow, it is common to require different configurations for several reasons, including for example:
- Distinguishing production robots operating in the field versus lab robots.
- Different robot models in a heterogeneous fleet.
- Managing specific settings that apply only to certain robot versions.
- Individual robots may be configured with specific settings while debugging one problem.
To address these needs, InOrbit Config API allows user to apply settings to subsets of the robot fleet, using a hierarchy based on scopes.
A scope defines the extent of the account to which a given configuration object applies. It is usually composed of two parts: a type and the identifier. The valid values are of the form:
"account", for the entire account associated to an app key; or"account/<accountId>"to explicitly refer to a given account."tag/<accountId>/<tagId>"for the set of robots containing a given tag<tagId>."robot/<accountId>/<robotId>"to apply a configuration on an individual robot.
Note that configurations at different scopes can contradict each other -- or rather, to re-define
or apply different configurations. For example, consider a robot with id C3P0 with two tags: interpreter and tatooine. This robot will get applied any configuration from its account, as well as configurations for its tags (tag/interpreter and tag/tatooine) and configurations at robot level robot/C3P0.
If a configuration object exists in more than one scope, the more specific scope would override the settings from more generic scopes. For example, robot has precedence over any other configuration (tag and account), and tag has precedence over account.
In this way, one can start with global configurations and also define specific settings for robot types, software versions, field locations, assigned customers, etc -- whichever form the account was configured.
When this configuration complexity appears, it is often the case that using Configuration as Code best practices become necessary too: for example applying configurations programmatically as opposed to manually applying settings, and using version-control to reliably maintain and audit the changes.
Config API Kinds Reference
Configuring: Data Sources
DataSourceDefinition configuration full schema
{
  "metadata": {
    "scope": "account",
    "id": "<dataSourceId>"
  },
  "apiVersion": "v0.1",
  "kind": "DataSourceDefinition",
  "spec": {
     "label": "",
     "unit": "",
     "scale": 1,
     "type": "",
     "timeline": {},
     "source": {
        "keyValue": {
          "key": ""
        },
        "rosDiagnostics": {
          "namespace": "",
          "key": ""
        },
        "networkUsage": {
          "interface": ""
        },
        "diskUsage": {
          "partition": ""
        },
        "textFile": {
          "path": ""
        },
        "imageFile": {
          "path": ""
        },
        "derived": {
          "transform": "",
          "filter": ""
        }
      }
  }
}
DataSourceDefinition example
{
  "metadata": {
    "scope": "account",
    "id": "<dataSourceId>"
  },
  "apiVersion": "v0.1",
  "kind": "DataSourceDefinition",
  "spec": {
    "label": "",
    "unit": "",
    "type": "",
    "timeline": {},
    "source": {
      "rosDiagnostics": {
        "namespace": "/Navigation/Docking",
        "key": "Docking Status"
      }
    }
  }
}
Configuring DataSourcesDefinition objects define which data from a robot is retrieved and
turned into robot attributes for visualization, defining
statuses and incidents for
monitoring and alerting, etc. Refer to the documentation for the basics on
Data Sources.
All Data Sources have a label, and optionally a unit (for example "m/s" for a data source
representing a velocity), which are used when displaying data in the app and alerts.
Optionally, one can define a type to force interpreting the value as an "array" or a
"json"-encoded object. When not defined, the type is "guessed" from the value received from the
robot (usually a string, depending on the source): a number if there are digits, a boolean for
the strings "true" and "false", or left unparsed as a string otherwise.
Values can be scaled using scale field, which multiplies the value reported by the robot before
storing it. This is specially useful for percentage data sources (with unit: "%") which need to
be in the range [0..1] to be interpreted and displayed properly. If the robot sends these values
in the range [0..100], then using scale: 0.01 will scale them so they get displayed as
percentages.
What defines how the data is captured is the source field.
It can contain only one of several possible keys, for each of the accepted sources:
keyValue: { key: "a key" }: Receives data published in the agent as a key-value pair in the form"a key=some value". The most common mechanism is through a ROS message in topic/inorbit/custom_data/0; in this way, multiple data sources can be transmitted through the same topic. Alternatively, key-value pairs can also be received through SDK in non-ROS environments.rosDiagnostics: { namespace: "a diagnostics path", key: "a key" }: Captures data published in ROS diagnostics messages, for one specificnamespaceor path, and onekey.networkUsage: { interface: "a network interface" }: Captures the network bandwidth usage of a specific network interface in the computer the agent is running on. Note that by default InOrbit agents already capture an overall network usage and the specific bandwidth used by InOrbit, but in some cases (for example if the overall usage includes intra-cpu traffic such as containers) the usage through a specific network card (wifi, 4G) may be of interest.diskUsage: { partition: "device path" }: Represents the total usage (as a fraction: from 0 to 1) of a specific volume in the computer the agent is running on. The path corresponds to the device, e.g."/dev/hda1".textFile: { path: "file path" }: Captures the contents of a text file; e.g. a log file, and transmits it as a data source; which can be used as any other robot attribute or visualized in a Custom Text File widget. The file is monitored for changes.imageFile: { path: "file path" }: Captures the contents of an image file; transmits it as a data source. The image can later be visualized in a Custom Image widget. The file is monitored for changes.derived: { transform: "an expression", filter: "an expression" }. Defines a data source as "derived" from others, by means of the expressiontransformwhich can use other data source values; for example to select one specific sub-field of a complex JSON object, or to combine multiple data sources into one. An optionalfilter(another expression) can also be given to skip updating the data source when the filter evaluates tofalse(or 0). See the expression language reference.
A DataSourceDefinition may also contain a timeline field to specify if the data should be stored in a
time-series database for visualization in different widgets (e.g. Timelines, Event Logs or History).
If the data is not numeric, timeline must contain fieldType specifying the type of data to store.
Configuring: Status Definitions
Status Definition Configuration Object Schema
{
  "metadata": {
    "scope": "account",
    "id": "<statusId>"
  },
  "apiVersion": "v0.1",
  "kind": "StatusDefinition",
  "spec": {
     "calculated": {
       "label": "<label>",
       "expression": "<expression>",
       "filter": "<expression>"
     },
     "rules": [
       {
         "function": "ABOVE/BELOW/EQUALS/NOT_EQUALS/CONTAINS",
         "params": [],
         "sustainedForSeconds": 120,
         "status": "OK/WARNING/ERROR"
       }
     ]
  }
}
Example status definition monitoring a motor temperature sensor
{
  "metadata": {
    "scope": "account",
    "id": "motorTemperatureId"
  },
  "apiVersion": "v0.1",
  "kind": "StatusDefinition",
  "spec": {
     "rules": [
       {
         "function": "ABOVE",
         "params": [70],
         "status": "WARNING"
       },
       {
         "function": "BELOW",
         "params": [85],
         "sustainedForSeconds": 60,
         "status": "ERROR"
       }
     ]
  }
}
Status definitions allows setting up rules to flag different problems in robots. For example, a battery level dropping below a threshold, a sustained low motor speed, or a specific data source receiving an unexpected value. Statuses are visualized in Fleet dashboards. and also serve as the source for defining Incidents -- see next section.
Each Status may take three values: OK, WARNING and ERROR. They are displayed in different colors in dashboards. To determine these values, a StatusDefinition is configured with a number of rules: the first one to match the current robot condition determines the status value.
Each rule contains the status value to assign (OK, WARNING or ERROR). The rule is defined by a function, one of EQUAL, NOT_EQUALS, BELOW, ABOVE or CONTAINS, which can be combined with an optional sustainedForSeconds. The sustainedForSeconds value ensures the rule is only triggered after the conditions are met for the specified amount of time. The argument(s) for the function are set in params, as a list of values. For example, to indicate if the temperature has been greater than 85 for over a minute, one would define { "function": "ABOVE", "params": [85], "sustainedForSeconds": 60 }.
A Status can be evaluated based on a data source value (see Data Sources). In this case, the <statusId> must match an existing data source id (and does not have a calculated object in its spec.
In the previous example, the statusId would be the ID of motor temperature's data source.
Alternatively, an advanced StatusDefinition can be defined using an arbitrary expression, using multiple data sources or robot tags. In this case, the calculated field must contain:
- A
expressionstring in InOrbit's expression language. This allows evaluating an arbitrary condition, such as "If a robot with the 'prod' tag is not moving and its current program is 'delivery'". - Optionally a
filtercan determine if the status is to be computed. This allows skipping computation. For example, when using a rich JSON data source as an input, certain messages can be skipped and will not update the status.
Expressions can use values from any robot data source, combine them with comparisons and logical operators, use aggregations on data sources, and even localization-related functions. See expression language reference below.
Note: The number of advanced StatusDefinitions is limited in Free Edition. See pricing page.
Once a Status changes its value to Warning or Error, this can trigger an incident. Refer to IncidentDefinition config objects below.
Configuring: Incident Definitions
Incident Definition Configuration Object Schema
{
    "kind": "IncidentDefinition",
    "apiVersion": "v0.1",
    "metadata": {
        "id": "string",
        "scope": "string"
    },
    "spec": {
        "statusId": "string",
        "label": "string",
        "warning": {
            "notificationChannels": [],
            "autoActions": [],
            "manualActions": [],
            "severity": "string"
        },
        "error": {
            "notificationChannels": [],
            "autoActions": [],
            "manualActions": [],
            "severity": "string"
        },
        "ok": {
            "notificationChannels": [],
            "autoActions": [],
            "manualActions": [],
        }
    }
}
Example incident definition: Both at Warning and Error status levels, this incident is notified in the app with an option to run a previously defined action
RunScript-123456. In the Error the incident is also notified in a Slack channel, and another action is automatically run.
{
    "kind": "IncidentDefinition",
    "apiVersion": "v0.1",
    "metadata": {
        "id": "batteryLow",
        "scope": "account"
    },
    "spec": {
        "statusId": "batteryLow",
        "label": "My Battery Incident",
        "warning": {
            "notificationChannels": ["app"],
            "autoActions": [],
            "manualActions": ["RunScript-123456"],
            "severity": "SEV 2"
        },
        "error": {
            "notificationChannels": ["app", "slack#support"],
            "autoActions": ["PublishToTopic-7890ABC"],
            "manualActions": ["RunScript-123456"],
            "severity": "SEV 0"
        }
    }
}
Incident definitions allows setting rules about how and when incidents are triggered and notified based on the configured statuses (see StatusDefinition). They define how these incidents must be notified, their severity levels, associated actions, and more.
Each incident definition has the following main properties:
id: Identifies the definition.statusId: The ID of the status definition that triggers this incident.label: A descriptive label for the incident.warning: Defines rules to handle the case when the associated status is in "warning" state. Including the notification channels, severity level and associated actions.error: Defines rules to handle the case when the associated status is in "error" state.ok: Defines rules to handle the case when the associated status switches to "ok" state.
The alerts for an incident can be routed through different notification channels. The actual channels depend on the integrations configured in the account. Available options are:
- InOrbit application:
app - Slack:
slack#... - Google Chat:
googleChat - OpsGenie:
opsgenie - Webhook:
webhook
For example, to be notified in the App as well as in a Slack channel called #alerts, the notification channels value would be: notificationChannels: ["app", "slack#alerts"].
Finally, the valid severity levels are: SEV 0, SEV 1, SEV 2, and SEV 3. These do not apply to ok states.
When an incident is triggered, there is the option to automatically run Actions on the robot. These are the actions listed (given their IDs) in
the autoActions field. Actions can also be an option for the user to be executed as a response
to an incident notification (in the app, Slack or any other notification channel).
For example, an action "Return to dock" could be one possible response from an operator to a low-battery
incident, after the user determines if there is enough battery left to complete the current task.
These actions are listed in the manualActions field. Refer to the next section on the
ActionDefinition kind to configure actions.
Note that the REST API can also be used to get the lists of valid status and actions IDs.
Find the full specification of the IncidentDefinition kind in JSON schema format at io-config-as-code repository.
Advanced Incidents
Combining different status, incidents and actions create a powerful tool for monitoring a robot fleet, including notifications through different channels for issue management (e.g. OpsGenie, Zendesk) and automation of common operations (e.g. L1 support).
This section includes complex examples that include all these pieces working together.
Example: Faulty Dock
Example to detect a failed docking attempt
[
  {
    "metadata": {
      "scope": "account",
      "id": "dockedNotCharging"
    },
    "apiVersion": "v0.1",
    "kind": "StatusDefinition",
    "spec": {
      "calculated": {
        "label": "Charging issues",
        "expression": "getValue('dsDockedStatus')==1 and not getValue('dsCharging')",
      },
      "rules": [
        {
          "function": "EQUALS",
          "params": [true],
          "status": "WARNING",
          "sustainedForSeconds": 30,
        },
        {
          "function": "EQUALS",
          "params": [true],
          "sustainedForSeconds": 120,
          "status": "ERROR"
        }
      ]
    }
  },
  {
      "kind": "IncidentDefinition",
      "apiVersion": "v0.1",
      "metadata": {
          "scope": "account",
          "id": "batteryIncident"
      },
      "spec": {
          "statusId": "dockedNotCharging",
          "label": "Docked and not charging",
          "warning": {
              "notificationChannels": ["app", "slack#incidents", "opsgenie"],
              "autoActions": ["script-action-retry-dock"],
              "severity": "SEV 2"
          },
          "error": {
              "notificationChannels": ["app", "slack#support"],
              "manualActions": ["script-action-retry-dock"],
              "severity": "SEV 1"
          }
      }
  }
]
We will assume the account has two data sources configured: dsDockedStatus
(with a numeric value with 1 indicating "successfully docked")
and dsCharging (a boolean value indicating that the main battery receives charging voltage).
They indicate if the robot is currently docked in its charging port, and if the battery is
currently charging (receiving actual voltage), respectively. These Data Sources
could be sourced from ROS data, SDK or API calls, etc. -- see reference.
A plausible scenario for robots is that they dock, but there is either a faulty connector in the dock
or some other electrical problem preventing their batteries from charging (dsCharging is false).
Each of the data sources' values is not indicator of a problem by themselves, but the combination of "docked" and "not charging" is a critical problem, as the robot will eventually run out of battery even if operators were around, not noticing is not really charging.
To detect and attempt to the situation, we provide a sample configuration (in the side panel) with the following features:
- The defined status
dockedNotChargingis computed from an expression combining both valuesdsDockedStatusanddsChargingwith boolean logic. The expression will take the valuetruewhen the robot reports itself as docked and is not charging. See expressions reference for other operators and functions. - The
StatusDefinitioncontains two rules: it will switch to WARNING state after 30 seconds (alerting, but allowing the situation to resolve itself) and turn to ERROR state after two minutes. There is also an
IncidentDefinitiondefining the notifications for this situation:a. On WARNING level a notification is only displayed in the app (in case operators are online). Additionally, an action `script-action-retry-dock' (refer to Actions reference) is automatically executed. This action could execute an action to make the robot push itself a bit more into the dock, in case the problem were loose electrical contacts in the dock port.
b. On ERROR level there are no actions executed, but the alert is propagated to several channels.
First, the app notifications is updated. The same alert goes to Slack to a channel called "#incidents",
and is also sent to OpsGenie. (Refer to Integrations documentation).
All these notifications include a link to jump to the app, directly to this robot's dashbboard
(this is a built-in feature).
They will additionally have a button to re-try executing the same script-action-retry-dock
action (which can be executed directly from the Slack message).
Note that if the WARNING level had resolved the situation (which is desirable, as the problem gets resolved automatically from InOrbit cloud), the event is still logged and will be found in the Audit Logs for this robot.
Navigation Problems
Complex example including detecting a robot unable to navigate towards its goal
[
  {
    "metadata": {
      "scope": "account",
      "id": "unableToNavigate"
    },
    "apiVersion": "v0.1",
    "kind": "StatusDefinition",
    "spec": {
      "calculated": {
        "expression": "(getValue('dsMission') in ['DELIVERY','RETURN-DOCK']) ? visitedAreaDiagonal(60) : null",
      },
      "rules": [
        {
          "function": "BELOW",
          "params": [2],
          "sustainedForSeconds": 600,
          "status": "ERROR"
        }
      ]
    }
  },
  {
      "kind": "IncidentDefinition",
      "apiVersion": "v0.1",
      "metadata": {
          "scope": "account",
          "id": "navigationProblem"
      },
      "spec": {
          "statusId": "unableToNavigate",
          "label": "Unable to reach destination",
          "error": {
              "notificationChannels": ["slack#support", "webhook"],
              "severity": "SEV 2"
          }
      }
  }
]
In this example a delivery robot is configured with a data source dsMission with string values representing
the current task type, which could include going to pick up an item, performing delivery tasks, returning to the doc or charging in the dock.
Some of these missions require the robot to autonomously navigate. Losing the ability to reach a navigation goal is one of the most common causes of problems in a robot -- for whatever cause (obstacles in a planned route, doors not opening, wheel malfunctions, etc.).
This situation can be detected by two conditions:
- If the value of
dsMissionincludes any of the known mission values, the robot is known to be navigating. In the example we include "DELIVERY" to represent carrying an element to a destination, and "RETURN-DOCK" when navigating back to its dock to recharge. The.includes()function determines if the list contains the actual value returned bygetValue()-- - The function
visitedAreaSide()returns an approximation of the area navigated by the robot during the last N seconds (60 seconds in the example).
The two values are combined with a ternary conditional: If the robot is navigating, its value is
the value of visitedAreaSide(); and otherwise it is simply null (no need to worry about speed or
travelled distance if the robot was on its dock, for example).
Refer to expressions language reference for a detailed usage of these and other
functions in StatusDefinition expressions.
The robot might not get to a full stop if it keeps retrying to avoid an obstacle, or if its motors or wheels are working too slowly; so using a simpler data source such as "linear distance" is not representative of the actual problem.
The StatusDefinition rule monitors the robot with plenty of time (five minutes) to get momentarily
stuck from another nearby robot or to wait for elevators doors to open, for example.
But once this time is elapsed, it turns into ERROR state.
In the ERROR, an immediate alert is sent through Slack, and also triggers a webhook call: If this is configured in the account, it can be hooked to an internal or third-party API, for example to send a SMS to field operators.
Configuring: Action Definitions
Action Configuration Object Schema
{
    "kind": "ActionDefinition",
    "apiVersion": "v0.1",
    "metadata": {
        "id": "string",
        "scope": "string"
    },
    "spec": {
        "label": "string",
        "description": "string",
        "confirmation": {
            "required": "boolean"
        },
        "widgets": ["string"],
        "arguments": [{
            "name": "string",
            "type": "string",
            "value": "any",
            "dataSourceId": "string",
            "input": {
                "control": "",
                "values": [{
                    "label": "string",
                    "value": "any"
                }]
            }
        }]
    }
}
Action definition example, using the value of a data source as an argument for a script execution.
{
    "kind": "ActionDefinition",
    "apiVersion": "v0.1",
    "metadata": {
        "id": "CancelCurrentMission",
        "scope": "account"
    },
    "spec": {
        "type": "RunScript",
        "label": "Cancel Mission",
        "arguments": [
            {
              "label": "filename",
              "value": "mission.sh",
            },
            {
              "label": "filename",
              "value": "--cancel",
            },
            {
              "label": "--mission-id",
              "dataSourceId": "MissionDataSourceId",
            }
        ]
    }
}
This example would publish a message to a ROS topic, for example
"START_DELIVERY|4|404", formatted using the current values of two robot data sources.
{
    "kind": "ActionDefinition",
    "apiVersion": "v0.1",
    "metadata": {
        "id": "Start Delivery",
        "scope": "account"
    },
    "spec": {
        "type": "PublishToTopic",
        "label": "Start Delivery",
        "arguments": [
            {
              "label": "message",
              "value": "START_DELIVERY||",
            },
            {
              "label": "floor",
              "dataSourceId": "FloorNumber",
            },
            {
              "label": "room",
              "dataSourceId": "RoomNumber",
            }
        ]
    }
}
The ActionDefinition kind allows configuring robot Actions. Actions are commands sent to the robots.
By configuring actions, operators can execute commands on the robots.
Actions can be hooked to incidents to be automatically run or offered as options for operators
to manually run when an incident occurs.
Learn more.
There are various types of actions and their configuration options vary depending on this type as well on the way they should run. The following is a reference for all configuration fields. Note that some options are only available to specific Editions, see pricing page.
id: Identifies the action. The number of user-defined actions can be limited in some editions.type: The action type, including executing scripts, publishing data to ROS topics, etc. (See below)label: A label to display in dialogs and buttons when this action is about to run. It is recommended to keep it short (one or two words).description: A more comprehensive description of the action, that will be displayed when action arguments are about to be input by a user.confirmation: Determines if the action requires an extra confirmation from the user before being executed. This confirmation will occur only ifrequired: trueis part of this object.arguments: A list of action arguments. These may be necessary depending on the action type and if its execution depends on user input or the robot state -- See next sections.widgets: A list of widgets this action should appear on for quick access. The only allowed value in this version is"navigation".
Action types
There are different action types to perform a number of robot actions. Each action type may expect some pre-defined arguments.
PublishToTopic: Publishes the value ofmessageargument through the/inorbit/custom_commandstopic. Its string value may contain replacements, see below.RunScript: Executes a shell script (indicated byfilenameargument) which must exist in the${HOME}/.inorbit/local/user_scriptsdirectory in the robot. Any additional argument specified in the argument sent as argument to the script.InOrbitPage: Defines an action to jump to a specific page or section in the InOrbit app, as defined by thepathargument. It is only available through the app in widgets and notifications (in app or notification channels).Url: Allows inserting a link to jump to an arbitrary (external) page, e.g. a third party incident management tool. Theurlargument defines the page, which may contain replacements, see below.DispatchMission: Dispatches a mission definition to a robot. ThemissionDefinitionIdargument defines the mission definition to dispatch.
Arguments and User Input
Each action type depends on specific arguments to be executed.
Some actions arguments, listed in the previous section,
allow performing replacements. For example, one could publish a message (via PublishToTopic action type) which includes the value of a given data source. To use this feature, define additional arguments and include their label within double curly brackets. This variable will be replaced with the value in the main argument.
See examples below.
Alternatively, arguments could be input by users at the time the action is executed.
This feature is only available to some Editions.
Defining an input element in at least one argument, causes a dialog modal to pop up before
the action is executed in order to set the argument values.
The accepted values for input are "text" and "select". The first one prompts a user with a
text entry dialog. The second one expects an additional property, values, to include the list
of options from which the user can select this value. Each option must be an objet with
{ label, value }: The value is sent to the action execution, while the label is only for
display at the dialog when for the user to know what the option is about.
Actions Examples
The first definition given as example defines an action that, when run,
executes a script mission.sh from the scripts directory ${HOME}/.inorbit/local/user_scripts,
passing the arguments: --cancel --mission-id <aValue>, where <aValue> is the current value
of MissionDataSourceId data source.
Note that some arguments have a label, passed to the script execution, and others do not.
Also, some arguments may have a fixed value ("mission.sh" or "--cancel") and others take
the value of a data source (MissionDataSourceId). Alternatively, the actual value can be
user-provided, when using the input field (only available to some Editions).
The second example defines a PublishToTopic action, which publishes a message to a ROS topic
(its type is a string: std_msgs/String).
Such message can be defined in advance in the message argument, or it can also be composed
using replacements from data sources values. In the example, the data sources FloorNumber and
RoomNumber, are data points for the destination of a robot hotel on a delivery mission. They are concatenated to form a single string message that a ROS node in the robot could receive and use to start a
mission.
Configuring: Dashboards
Basic Robot Dashboard
{
    "kind": "DashboardDefinition",
    "apiVersion": "v0.1",
    "metadata": {
        "id": "my-robot-dashboard",
        "scope": "account"
    },
    "spec": {
        "label": "Robot",
        "sections": [
            {
              "label": "Health",
              "scope": "robot",
              "withControlWidget": true,
              "widgets": [{
                  "type": "chart",
                  "label": "Vitals",
                  "dataSources": [{
                    "id": "cpuLoadPercentage",
                    "label": "CPU",
                    "type": "gauge"
                  }, {
                    "id": "ramUsagePercentage",
                    "label": "Memory",
                    "type": "gauge"
                  }, {
                  "type": "chart",
                  "label": "Timeline",
                  "layout": {
                    "grid": 8,
                    "chroma": true,
                    "rows": 1
                  },
                  "dataSources": [{
                    "id": "cpuLoadPercentage",
                    "label": "CPU",
                    "op": "maximum"
                  }, {
                    "id": "ramUsagePercentage",
                    "label": "Memory",
                    "op": "average"
                  }]
              }]
            }
        ],
        "order": 3
    }
}
Dashboards define the user experience for you and other users in your account. They define what information is displayed to monitor and operate robot fleets, which is highly dependent on the robots characteristics, monitoring and operational needs, and size of fleet among other factors. Refer to this document for an overview of what you can do with Dashboards and its related concepts: Sections and Widgets.
This section gives a specification for dashboards to configure them through Configuration APIs. This is a rather advanced usage and allows to fine-tune the experience providing further control on each configuration parameter as well as to apply Configuration Management practices to your account. It is adviced to start with dashboards defined through the Settings interface, then export them using the Config APIs with the CLI, for an easier start with a mostly configured dashboard.
Dashboards can be customized depending on robot types or other conditions. Different widgets can appear to display only those that make sense to the selected robot, as well as to offer only the actions that apply to this robot. Further detail on Robot-based dashboards customization.
Dashboards are configured through the DashboardDefinition kind, using a unique id and only
at "account" level. A dashboard must have a label, and can define a numeric order property
to define the order it appears as compared to order dashboards order value.
Each dashboard defines a list of sections. Sections also define a label or title.
They use a withControlWidget property to define if a control bar appears in the section,
allowing to select the current robot, or timeframe to display, or current filters.
it is normally recommended to have a control widget; except when multiple sections of the same
scope appear in the same dashboard.
Sections also have a scope that define the type of widgets that can appear in the section.
Valid scopes are:
"fleet": To display information about a set of robots (or the entire fleet), such as an overview of all robots' statuses, a list of incidents, audit log, etc."robot": A section that displays (normally current) information about a selected robot"navigation": Normally contains a single Navigation widget, which allows to view a robot in its map (position, planned path, costmap, traffic zones), with cameras and controls to tele-operate it."timeCapsule": To contain Time Capsules, a tool to analyze past events on a robot around a given point in time to perform root cause analysis and optimize robot behavior."mission": Reserved for widgets to display missions' metrics (KPIs). Note that this feature is not available on all Editions.
Sections can also be displayed or hidden conditionally (see below).
Sections contain a list of widgets, which are the actual contents and most important part
of a dashboard. There are many different widget types.
Every widget contains some common properties like a label and a type (see below), and a
layout defining its size and position. Just like sections, widgets can also be displayed
conditionally (see below).
Depending on the widget type, each widget accepts its own parameters in a config object:
for example which data sources to display, or what actions to offer to execute, etc.
Valid options for config objects are listed below; except for widgets that do not have
any configuration options (they only accept an empty {} object).
Fleet widgets
"fleetStatus": The main widget to display the list of robots and their statuses (with Error, Warning, Ok). It can be configured with a liststatuses, ids ofStatusDefinitionobjects to display a specific list of statuses (by default it displays those configured globally in Settings UI)."incidentTimeline": A calendar-like timeline of incidents for the entire fleet (or selected robots)."incidentList": A listing incidents for the entire fleet (or selected robots). It works in sync with the Incident Timeline, and allows jumping to Time Capsule to dig into the time window of an incident."kpi": A widget with account-level KPIs such as number of robots, users/robots ratio, etc."locations": A world map with indicators of your configured locations and their states; that can be zoomed in at location level to display its robots."auditLogFleet": An audit log for the fleet or a selected set of robots."fleetMissionTracker": A listing of missions already executed and being executed by the robots fleet. It allows zooming into past missions to debug in Time Capsule.
Robot widgets
All robot widgets display information or act on a selected robot, which can be selected from the control widget or widgets that support selection (Fleet Status, Navigation).
Data Sources:
"chart": A timeline chart displaying variation in values of multiple data sources. It displays a line chart by default, unless achartTypeproperty is used (valid values:"linechart"and"areachart"). It requires a listdataSourcesobjects with the data sources to display. Each data source must have anidandlabel, and can also specify a numericprecisionandscaleto adjust values; and also the operation to perform to aggregate values in time windows (one of"average","count","maximum","minimum","sum","last"). Scale in Y-axis is automatically adjusted, unless two propertiesminandmaxare given to fix the scale. See example on the right sidebar."vitals": A widget that supports displaying up to 4 data sources values. ItsdataSourceslist contains the data sources identified withidandlabel. An optionalunitcan be specified for each data source, as well as atypeof visualization: a"text"representation of a"gauge"used normally with numeric values."listData": It displays several data sources in a table. It is configured similarly to"vitals", with a list ofdataSourceswithid,labelandprecision."keyValues": It displays a list of all key-value pairs reported by the robot with their most recent updatd timestamp."history": It displays a table with the most recent updates received to a specific data source, and their timestamps."stateTransitions": Similarly tochart, it displays a timeline of several data sources; with colored bars representing how long each data source stays in a given value and changing colors when those states change. It is configured with adataSourceslist of objects withidandlabel.
Monitoring and operation:
"localization": A small version of the Navigation widget (see next scope), displaying the robot in a small map."actions": Displays configured actions that can be execute on the robot. All configured actions are displayed, except if a list of stringsactionIdsis explicitly given to limit the selection. Two other boolean values can be used to tweak the appearance:expandedwill auto-expand action groups, andbigButtonsdisplays larger buttons (useful for dashboards prepared for mobile devices)."cameraWidget": A widget displaying the a live camera. It is configured with a singlecameraIdstring that identifies the camera to display."tagsAndModes": A listing of all tags assigned to a robot, including its current Mode. It also allows editing those tags."missionTracker": It displays the most recent missions executed by the selected robot.
Auditing:
"auditLog": Displays a log of the most recent events of the robot (or those events in the selected time window)."diagnostics": A visualization of data reported as ROS Diagnostics, for ROS-based robots."dataBags": A listing of rosbags and other files (logs, etc.) configured to be collected by the robot. Each file has an option to be uploaded from the robot to the cloud (to later download it, without the user needing to connect to the robot).
Navigation widgets
"navigation": The only widget for a Navigation dashboard. It displays a map with the current position of the robot in its map, displaying (if reported) its paths, costmap, lidars readings and camera images. It can also display other robots in the area, as well as map features such as traffic zones, named waypoints, etc. Additionally, if supported by the robot and configured, it also allows doing teleoperation.
Time Capsule widgets
These widgets are specialized versions of some widgets already listed above; with the excpetion that they do not show "live" data but instead are controlled through the Time Capsule toolbar, to display past data at specific points in time.
"timeCapsuleMap": A version of"navigation"to work within Time Capsule."timeCapsuleSegmentLogs'": A version ofstateTransitionsto work within Time Capsule"timeCapsuleAuditLogs": A version ofauditLogto work within Time Capsule"timeCapsuleDataBags"A version ofdataBagsto work within Time Capsule
Mission widgets
apiVersion: v0.1
kind: DashboardDefinition
metadata:
  id: my-dashboard
  scope: account
spec:
  label: KPIs
  sections:
  - comment: ''
    label: Missions
    scope: mission
    widgets:
    - config:
        kpis:
          - kpiDefinitionId: mission-success-rate
          - kpiDefinitionId: mission-duration
          - kpiDefinitionId: mission-distance
          - kpiDefinitionId: "missions"
            display:
              isHeader: true
              icon: "MISSION"
          - kpiDefinitionId: "robots"
            display:
              isHeader: true
              icon: "ROBOT"
        tableColumns:
          - id: "status"
            label: "Status"
            config:
              attributeIds:
                - "data.status"
            type: "statusChip"
          - id: "missionName"
            label: "Mission name"
            type: "string"
            config:
              attributeIds:
                - "data.label"
          - id: "robotName"
            label: "robot name"
            type: "string"
            config:
              attributeIds:
                - "data.robotName"
          - id: "startTs"
            label: "Start"
            type: "time"
            config:
              attributeIds:
                - "startTs"
          - id: "endTs"
            label: "End"
            type: "time"
            config:
              attributeIds:
                - "endTs"
          - id: "duration"
            label: "Duration"
            type: "withUnit"
            config:
              attributeIds:
                - "data.duration"
              unit: "ms"
      label: Mission KPI
      layout:
        grid: 12
        withoutBackground: true
      type: missionKPI
    withControlWidget: true
"missionDefinitions": It displays mission definitions and their steps. It also allows dispatching missions for their execution."missionKPI": It displays aggregated information on missions executed by the fleet, allowing to perform various filters such as by time, robot tags, mission results. It can be configured with:kpis: A list of KPI definitions to display, each with akpiDefinitionIdthat references a configured KPI.tableColumns: A list of column configurations for the mission data table. Each column includes:id: Unique identifier for the columnlabel: Display name for the column headertype: Column data type (e.g., "statusChip", "string", "time", "withUnit")config: Configuration object containing:attributeIds: Array of field paths to extract data from KPI objects. All, butstatusChiptype columns, accept any number of attributes in theattributeIdslist. In this case, the first attribute that exists in the KPI object will be used. ForstatusChiptype columns,attributeIdsis ignored. The mission state and status are used to determine the status chip.unit: Unit of measurement (for "withUnit" type columns). It's used to display the value with the unit in the table. For known units, like "m" and "ms", data values are assumed to be in the set unit and the value is converted to whichever unit is more convenient for display.
See KPI Definitions section for more details on the fields available for KPI objects.
Conditional functionality
{
    "kind": "DashboardDefinition",
    "apiVersion": "v0.1",
    "metadata": {
        "id": "my-dashboard",
        "scope": "account"
    },
    "spec": {
        "sections": [{
          "label": "A conditional section",
          "conditional": {
            "tags": ["only-this-tag"]
          },
          "widgets": [...]
        }]
    }
}
To allow conditional display of widgets or entire sections, both elements allow to be toggled on only if the current robot has been assigned a tag. This allows creating dashboards that will display differently for different robots. See Robot-based Customization section for more details.
The configuration for this feature is given by an object like { "conditional": { "tags": ["my-tag"] } },
specifying either in a section or a widget that will only be displayed if the robot contains tag "my-tag".
Configuring: Preferences
{
    "kind": "Preferences",
    "apiVersion": "v0.1",
    "metadata": {
        "id": "all",
        "scope": "account"
    },
    "spec": {
        "navigationWidget": {
            "panels": {
              "teleop": false
            },
            "actions": ["action1", "action2"]
        }
    }
}
Additionally to their configuration given in Dashboards, some parts of the user interface may
be adjusted using the Preferences kind.
This also includes global properties that apply to all widgets if a given type.
And most importantly, Preferences can be applied at different scopes ("account", "tag" or "robot")
so the preference will be applied differently depending on the selected robot.
Currently, only Navigation widget allows setting Preferences. They include:
panels: An object with panel names that can be hidden. Its keys can be"teleop","camera","gauges","localization"and"background". By setting any of these values tofalse, the Navigation widget will not display them. This is useful for example when a robot does not implement a feature or simply teleoperating it is not desired.actions: A list of ids of actions to display in the Navigation toolbar, which allow for quick execution of actions while monitoring the robot. Applying thesePreferencesat the correct scopes, one could only offer actions that apply to a robot type, or robots in a specific location for example.
Configuring: Robot Camera
Cameras Configuration Object Schema
{
  "kind": "RobotCamera",
  "apiVersion": "v0.1",
  "metadata": {
    "scope": "<scope>",
    "id": "<cameraId>"
  },
  "spec": {
     "label": "front",
     "shortLabel": "F",
     "rosTopic": "usb_cam/image_raw",
     "width": 320,
     "height": 240,
     "rate": 1,
     "outputEncoding": "rgb8",
     "quality": 20,
     "rotation": 0,
     "mirror": false,
     "enabled": true
  }
}
The RobotCamera kind allows configuring cameras with still images transmitted from robots. This allow users to set and adjust parameters for their camera feeds.
Each camera configuration has the following properties:
id: Identifies the camera.label: Label displayed on screenshortLabel: Optional short label to replace the default label (normally the first letter oflabel)rosTopic: The ROS topicwidth: Integer of width in pixelsheight: Integer of height in pixelsrate: The number of frames per secondoutputEncoding: Encoding type, default is "rgb8"quality: Integer of quality between 0 and 100rotation: Rotation of the camera feed in multiples of 90mirror: Optional boolean for mirroring image. Default is falseenabled: Boolean for enabling camera. Default is true
Configuring: Robot Footprint
Robot Footprint Object Example
{
  "metadata": {
    "scope": "<scope>",
    "id": "all"
  },
  "apiVersion": "v0.1",
  "kind": "RobotFootprint",
  "spec": {
    "footprint": [
      { "x": -0.5, "y": -0.5 },
      { "x":  0.3, "y": -0.5 },
      { "x":  0.7, "y":  0.0 },
      { "x":  0.3, "y":  0.5 },
      { "x": -0.5, "y":  0.5 },
    ],
    "radius": 0.2,
  }
}
The RobotFootprint kind allows configuring the footprint of a robot. The footprint is the area that the robot occupies in a map and it is used for representing the robot in map views.
Unlike most other configurations in this section, RobotFootprint is a "global" config, meaning there can only be one per unique scope. For this reason, the only accepted id value is "all".
The spec of a robot footprint configuration has the following properties:
footprint: (Optional) Footprint shape, defined as a list of points of minimum length 3. Each point is an object withxandyproperties, representing the position of the point in meters relative to the reported position of the robot. If not provided, the footprint will take a circular shape with a radius set by theradiusproperty.radius: (Optional) Sets the size of the inner orientation indicator. If set to0, no indicator will be shown. Iffootprintis not provided, the radius of the circular footprint will be adjusted proportionally to this number.
Note: If only one of the two properties is provided, the other will be taken from the configuration applied to the robot's tag(s) or the configuration at the account level.
Configuring: Mission Tracking
Mission Tracking config schema
{
  "metadata": {
    "scope": "<scope>",
    "id": "all"
  },
  "apiVersion": "v0.1",
  "kind": "MissionTracking",
  "spec": {
    "processingType": "api|derived",
    "attributes": {
      "attributeId1": [
        {
          "type": "string",
          "path": "optional string",
          "values": ["value1", "value2"],
          "acceptBeforeStart": 0,
          "acceptAfterEnd": 0
        }
      ],
      "attributeId2...": []
    },
    "missionFields": {
      "field1": {
        "defaultInitialValue": "value",
        "defaultFinalValue": "value",
        "index": false
      },
      "field2...": {}
    },
    "stateDefinitions": {
      "state1": {
        "defaultStatus": "ok|error|warn",
      },
      "state2": {}
    },
    "execution": {
        "modes": {
            "start": "tagId",
            "end": "tagId"
        },
        "useLocks": true,
        "waypoints": {
            "distanceTolerance": 1,
            "angularTolerance": 1,
        }

    }
  }
}
Mission Tracking allows users to observe and measure their robots' performance while they execute their assigned tasks. Missions vary for every fleet of robots, and InOrbit's API is a generic model to accomodate this. A Mission could represent picking objects, delivering items, cleaning areas, etc.
Note: Mission Tracking is an advanced feature available only in certain editions. Please contact us for questions, pricing and help to get started.
This section details the Config API schema. For details on Mission Tracking concepts, refer to Mission Tracking documentation.
Note that unlike most other APIs in this section, Mission Tracking applies to all missions in general.
For this reason, the only accepted id value is "all".
The configuration schema has many different options to accommodate a wide range of Missions. Most fields are optional; and some accept shorter versions for brevity:
processingTypeindicates if Missions are defined via API calls (processingType: api) or "derived" through data source updates (processingType: derived). API is the recommended processing type. Mission updates are sent by the agent on one data source in the form of JSON-encoded objects. These objects are translated into REST API calls to the Missions REST API, and must adhere to its schema. The second case defines one specific data source to act as "boundary" for Missions. When this data source emits a specific value (seeattributesfield) then a mission is assumed to start; and it ends when the data source switches back to a different value. Normally, only one method is used per account; but they can be combined by settingprocessingTypeto an array containing both processing type values.attributesspecifies how to map attribute updates to Missions. This is an object whose keys are attribute ids, and the values are lists of mappings. (In the case of using only one mapping, which is the most common scenario, an object value within an attribute key is also accepted --see example). Each element should contain thetypeof this mapping. The most important one is the"mission"type, defining which attribute contains the JSON-encoded API calls or the Mission boundary values (for "api" and "derived" processing types, respectively). More details on attributes are given below.missionFieldsconfigures some special behaviors to Mission fields such asstate. It can set default initial and ending values which are used if the mission did not receive values to update them.stateDefinitionsallows giving more semantics to thestatemission field, enabling each state value (a free-form string, although some common states are normally used) to be mapped to a status (one of "ok", "error" and "warn", which are used to determine some metrics when aggregating missions).executionallows adding some options that define how missions are going to be executed, adjusting some default behaviors for missions.
Attributes
Each of the objects in attributes define a mapping from a data source (or a portion of it) to a mission field. Each of these objects accept the following fields:
type: The semantics of the mapping is first defined by this field, one of:"mission": InprocessingType = "api", this is the data source containing JSON API call updates. InprocessingType = "derived", this is the mission boundary."label": Defines a mission name, viewable in the mission widgets and reports."state": Defines the current mission "state", such as "in-progress", "completed", "stuck", etc. Any string value is accepted and their meaning is only assigned by the user."status": Defines the current mission status: "ok", "error" or "warn", which is used to determine if the mission was successful when building mission reports."data": Defines a mission metadata field. In addition to mission fields defined in the REST API schema (label, state, status, etc.), any number of data elements can be added within adataobject as metadata. Seelabelfield above."percent": Defines the mission completion percentage; given as a float number between 0 and 1."startTs": Defines the start timestamp (in epoch milliseconds) of the mission. It is not necessary to define one; as otherwise the start timestamp is assumed to be the time of the mission creation."endTs": Similarly tostartTs, for the mission end time.
values: Only used for the"mission"attribute. Defines which values represent that the robot is currently running a mission. For example,["delivery"].path: If the attribute is typed as "json" (see Data Sources), then a specific sub-element of it can be selected to determine the mapping. For example, if a data source reports an update of a state machine such as{ navGoalId: 1234, currentTask: 'delivery', targetRoom: 101 }, then a path value"currentTask"could select the"mission"attribute and a path valuetargetRoomcould be mapped to adataelement -- defining two different mappings for the same attribute.label: Only used fordata-typed attributes. Thedataobject in missions is a key-value dictionary. The keys are defined by the label of the attribute.acceptBeforeStartandacceptAfterEndallow receiving mission field updates not strictly within the time window where themissionattribute takes the values that define a mission. This is used since attributes could be published (and received in the cloud) within some seconds difference, and also because mission plans or mission summaries could be published before or after the mission. These optional values are a number of seconds to allow to wait for additional attribute updates (acceptAfterEnd) or to look for previous updates (acceptBeforeStart) when a mission starts.
Execution
The following fields define some behaviors for missions execution, fields that indicate if robots are going to be locked by the missions when they start and finish running, among other options.
modes: Defines which modes (tags) are going to be assigned to a robot when it starts or ends the mission execution. The Ids of the tags can be retrieved by using the InOrbit CLI."start": Id of the tag (it needs to be a Mode) that you want to assign to the robot when it starts executing a mission."end": Id of the tag (it needs to be a Mode) that you want to assign to the robot when it ends executing a mission.
useLocks: Boolean. If true, the robot will be locked by the InOrbit service user every time it starts executing a mission and unlocked when it finishes the execution.waypoints: Defines tolerances for waypoints, if the pose of the robot is within the tolerated values, assumes that the goal of the waypoints has been reached."distanceTolerance": A float value that tells how much distance will be tolerated to indicate that a waypoint was successful"angularTolerance": A float value that tells how much angle will be tolerated to indicate that a waypoint was successful
Example
Mission Tracking complex example
{
  "metadata": {
    "scope": "account",
    "id": "all"
  },
  "apiVersion": "v0.1",
  "kind": "MissionTracking",
  "spec": {
    "processingType": "derived",
    "attributes": {
      "stateEvent": [
        {
          "type": "mission",
          "path": "currentTask",
          "values": ["delivery"]
        },
        {
          "type": "data",
          "path": "targetRoom",
          "label": "Room"
        }
      ],
      "navigationStatus": {
        "type": "state",
        "acceptBeforeStart": 20
      },
      "pathCompletion": {
        "type": "percent",
        "acceptAfterEnd": 60
      }
    },
    "missionFields": {
      "state": {
        "defaultInitialValue": "planning"
      }
    },
    "stateDefinitions": {
      "elevator-issue": {
        "defaultStatus": "warn",
      }
    }
  }
}
In this example, a json-typed attribute is used for two purposes. Whenever its currentTask field
has value "delivery", this marks the mission start. Then, the value of targetRoom field is added
to the mission metadata. Thus, the config part of this attribute is a two-element array.
All other attributes contain a single object, as they are mapped to only one mission field.
Each mission initial state is "planning", a user-defined value.
The missions will last as long as the currentTask value is "delivery".
During that time and up until 20 seconds after it switches to a different value, any value of navigationStatus attribute
will be used as the mission state. A user-defined state "elevator-issue" is assigned a "warn"
status, meaning it will be colored accordingly (yellow) in widgets and reports, and the mission would not
be considered successful if this is its final state.
Also within the mission duration and one minute after it ends, the value of the pathCompletion
attribute is used as completion percentage.
Configuring: Mission Definitions
Status: Early Access. Note: These features are not available in all Editions. See pricing page.
Mission Definition config
apiVersion: v0.1
kind: MissionDefinition
metadata:
  scope: account
  id: "<missionId>"
spec:
  label: Mission name
  steps: # The sequence of steps to complete the mission
  - label: "Setup mission data"
    data:
      # Sets mission's metadata. Also available through Mission Tracking APIs,
      # from robot-reported data
      itemType: "bottle"
      weight: 1.23
      containerNumber: 1
  - label: "Go to drop off location"
    waypoint:
      # Navigating to a waypoint, given its coordinates (see Named Waypoint example below)
      x: 1.10
      y: 20.98
      theta: 1.23
      frameId: "map"
    timeoutSecs: 300
  - label: "Wait 5 seconds"
    # A simple wait
    timeoutSecs: 5
  - label: "Open lid"
    runAction:
      # Runs an action defined in the robot
      actionId: script-open-lid
      arguments:
        ledColor: "#ff00ee"
        lidNumber:
          _data: "containerNumber" # Refers to values stored in "data" object
  - label: "Wait for lid to be closed"
    waitUntil:
      # Evaluates an expression and waits until it has a True value
      expression: getValue("lid_open") == 0
      timeoutSecs: 60
    completeTask: "Pickup"
  - label: "Go to dock"
    # Navigates to a pre-defined, named waypoint
    waypoint: "dock"
    completeTask: "Delivery"
  selector:
    robot:
      # The selector allows restricting which robots can execute the mission.
      # Criteria include robot tags, inclusion lists or name patterns.
      tagIds: ["delivery_bot"]
Mission Definition with expression evaluation
apiVersion: v0.1
kind: MissionDefinition
metadata:
  scope: account
  id: "<missionId>"
spec:
  label: Mission Name
  steps:
  - data:
      Greetings : helloWorld
      Mode DataSource for r2d2 :
          expression: getValue("mode_ds")
          target:
              robotId: r2d2
      Mode Datasource for Wall-e:
          expression: getValue("mode_ds")
Mission Definition with if-else conditional step
apiVersion: v0.1
kind: MissionDefinition
metadata:
  scope: account
  id: "<missionId>"
spec:
  label: Priority-Based Delivery Mission
  steps:
  - label: "Go to pickup location"
    waypoint: wp-pickup
    timeoutSecs: 300
  - label: "Wait 1 minute"
    timeoutSecs: 60
  - label: "Handle based on mission battery"
    if:
      expression: getValue("battey") < 25
      then:
      - label: "Use express path"
        waypoint: "urgent-dropoff-zone"
      else:
      - label: "Use standard path"
        waypoint: "dropoff-zone"
InOrbit allows configuring what missions are for your robot fleet, as well having them executed
by your robots: whether these are repeated, pre-defined missions or one-off missions that trigger
a one time task. This is achieved through the MissionDefinition kind and the
Mission Dispatch APIs, as well as MissionSchedule to program the execution of future missions.
Note that these definitions work together with mission tracking,
which works both on missions defined through InOrbit as well as missions executed by any proprietary
software in the robot that are reported to InOrbit through the Mission Tracking APIs.
Some parameters to tune mission execution and mission tracking can be adjusted
using the MissionTracking kind.
Missions are defined using the MissionDefinition kind. Each mission definition is identified by
a unique missionId and uses a human-readable label or name.
Missions consist of a series of steps to be executed sequentially, and may also contain
a selector to define which robots are allowed to execute it.
Steps can be of several types. All steps accept a label to describe the step (which is displayed
in mission widgets), and an optional timeoutSecs property to define a maximum wait in seconds for
the step to execute.
The field completeTask allows to define a "task" to be marked as complete when this step
finishes execution. This is displayed in Mission widgets, and useful to understand the overall
progress of a mission consisting of many (small) individual steps. For example, after going
to a drop-off location, opening a lid and waiting for a user confirmation (3 mission steps) a
single task "Delivery" could be mark as completed.
The available mission steps are:
Navigating to a waypoint: If a
waypointproperty is present. This field can contain an object with{ x, y, theta, frameId }representing the target pose to navigate to. The frameId is optional; used to reference sub-locations (e.g. different floors). Alternatively, a single string of the form"<annotationId>"can be used to refer to existing, named waypoints defined in the robot location (defined through the Annotations API or in the Navigation widget),Executing an action: A mission step can consist of executing an arbitrary action in the robot. This action could represent turning on a rotary brush, opening a lid to allow a user to pick up an object, etc. These steps contain an
actionIdfield, referring to an already definedActionDefinition: they may be implemented through scripts installed in the robot, publishing messages to ROS topics or other action types; see action definitions. The optionalargumentsobject define the action argument values. They may be constants (numbers, strings) or refer to mission fields within thedata(mission metadata created by user) orarguments(mission metadata passed while dispatching the mission). A single object such as{ _data: "<dataKey>" }withinargumentswill get replaced by the data value at the moment the step is to be started. Similarly, a key_argumentsis used to fetch values from the initial mission arguments. If enabled, actions can also be run on a different robot, for scenarios where multiple robots or devices need to be orchestrated. This uses thetargetmechanism -- see "Waiting for a condition" below.Updating mission's data: At any point during the mission (specially at mission start, or after completing intermediate goals) the mission metadata (see Mission Tracking) can be updated. This metadata is a simple dictionary of key-value objects, containing whatever values represent the mission data: product ids, route name, order numbers, customer names, etc. This step type is defined with a
datafield, containing an object with the mapping from metadata field names to their values.
You can also make an expression evaluation using theexpressionfield. And, similar to "Waiting for a condition" mechanism, you also have the option to select in which robot the expression is evaluated. To do so, you can use thetargetfield, and select the robotId to use. See example for more.Waiting for a condition: A mission step may consist of simply waiting for a condition to happen. This is defined with a field
waitUntil. These steps contain anexpressionfield. The step will wait until the expression evaluates totrue. See expressions language to check the supported expressions. Just as when running actions, conditions can also be evaluated on another robot, not the one executing the mission. For this, use{ target: { robotId: "<robotId"> } }in thewaitUntilstep. This is also supported when running actions.If-else conditional: A mission step can conditionally execute different sequences of steps based on an expression evaluation. This is defined with a field
if. These steps contain anexpressionfield that is evaluated to determine which branch to execute. If the expression evaluates totrue(or a truthy value), the steps in thethenarray are executed; otherwise, if anelsearray is provided, those steps are executed instead. Thethenarray is required, while theelsearray is optional. See expressions language to check the supported expressions. Just as when running actions or waiting for conditions, the expression can also be evaluated on another robot, not the one executing the mission. For this, use{ target: { robotId: "<robotId"> } }in theifstep. The nested steps inthenandelsearrays can be any valid mission step types, including other conditional steps for more complex logic. Note that if the expression evaluation fails, the missions is aborted.A simple wait of a predefined number of seconds. This step only uses the
timeoutSecsproperty.
Mission Selector schema
{
  "robot": {
    "tagIds": ["picker-robots", "firmware-023"],
    "robotIds": ["picker001", "picker002"],
    "robotId": "picker001",
    "namePatterns": ["picker.*"]
  }
}
The selector property is used in mission definitions to restrict what robots can execute
the mission.
It consists of a single property robot with different ways to define what robots are accepted.
If multiple conditions are present, all of them must hold for a robot to execute the mission.
Conditions are defined by fields:
tagIds: Defines a list of tags (given by their ids) that the robots must have at the time of dispatching the mission. Its value must be list of strings.robotIds: Explicitly enumerates which robots (given by their ids) can execute the mission. Any of these robots can be selected. Its value must be list of strings.robotId: Similar torobotIds, as a shorter form to define a single robot by an id.namePatterns: Allows defining one or more regular expressions that will need to match the robot name for a robot to be selected for the mission.
Configuring: Mission Schedules
Status: Early Access. Note: These features are not available in all Editions. See pricing page.
Mission Schedule config
apiVersion: v0.1
kind: MissionSchedule
metadata:
  scope: account
  id: "<scheduleId>"
spec:
  label: "End of day schedule"
  missionDefinitionId: "run_task_queue"
  cron: "0 18 * * *"
  disabled: false
  args:
    task_queue: "vacuum_zone_a"
    map_name: "floor_1"
  selector:
    robot:
      robotId: "robot-001"
MissionSchedule allows you to configure recurring, time-based mission dispatches for your robot
fleet. Each schedule is tied to a MissionDefinition and uses a cron expression to define when
the mission should be triggered.
Mission schedules are only supported at the account level.
The spec of a MissionSchedule configuration has the following properties:
missionDefinitionId: (Required) The ID of theMissionDefinitionto dispatch when the schedule triggers.cron: (Required) A cron expression defining when the mission is dispatched. Standard 5-field cron syntax is supported (e.g."0 18 * * Mon-Fri"for weekdays at 6 PM).label: (Optional) A human-readable name for the schedule, displayed in the app.disabled: (Optional) Whentrue, the schedule is defined but will not trigger any missions. Defaults tofalse.args: (Optional) An object with key-value pairs passed as arguments to the mission when it is dispatched. These correspond to theargumentsavailable in mission steps.selector: (Optional) Restricts which robot the mission is dispatched to. Contains a singlerobotproperty with the following field:robotId: The ID of the robot to dispatch the mission to.
Configuring: KPI Definitions
KPI Definition Object Example
metadata:
  scope: account/<ACCOUNT_ID>
  id: total_area_covered
apiVersion: v0.1
kind: KpiDefinition
spec:
  label: Total area covered
  objectType: mission
  field: data.data_Area Covered
  aggregation: SUM
  filters:
    - field: data.state
      operator: "="
      value: "completed"
---
apiVersion: v0.1
kind: KpiDefinition
metadata:
  id: active_robots_per_day
  scope: account
spec:
  aggregation: COUNT_DISTINCT
  field: entityId
  filters:
  - field: data.state
    operator: '='
    value: completed
  intervalMinutes: 1440
  label: Avg Active robots
  objectType: mission
  secondAggregation: AVG
The KpiDefinition kind allows you to define and configure Key Performance Indicators (KPIs) for your fleet. KPIs are metrics that help you track the performance of your robots over time. They can be used to monitor various aspects of your operations, such as mission success rates, area covered by your robots in missions, or incidents rates.
KPI definitions are only supported at the account level.
The spec of a KpiDefinition configuration has the following properties:
label: A human-readable label for the KPI, which will be displayed in dashboards.unit: (Optional) The unit of measurement for the KPI (e.g., "%", "meters", "seconds").objectType: The type of object to aggregate data from. The possible values aremissionandincident.field: The specific field of the object to aggregate.aggregation: The aggregation function to apply to the field's data. Supported values are:SUM,AVG,MIN,MAX,COUNT,COUNT_DISTINCT.intervalMinutes: (Optional) The time interval in minutes over which to aggregate the data.secondAggregation: (Optional) A second aggregation function to apply after the first one. Supported values are the same as foraggregation.filters: (Optional) A list of filters to apply to the data before performing the aggregation. Each filter is an object with the following properties:field: The field to filter on.operator: The comparison operator to use. Supported values are:=,!=,>,<,>=,<=.value: The value to compare against.
Valid fields for KPI objects are:
id: The ID of the object.entityId: The entity ID of the object.entityType: The entity type of the object.type: The type of the (e.g.mission,incident).startTime: The start time of the object.endTime: The end time of the object.data.label: The label of the object.data.duration: The duration of the KPI object.data.estimatedDistance: The estimated distance covered by the robot between thestartTsandendTsof the KPI object.
For objects of type mission, the following fields are also available:
data.state: The state of the mission.data.status: The status of the mission.data.isSuccess: True if the mission was successful, false otherwise.data.isSuccessNum: 1 if the mission was successful, 0 otherwise.data.incidentsCount: The number of incidents of the mission.data.completedPercent: The percentage of the mission that was completed.data.data_${mission_data_key}: The value of the mission data key.
Configuring: Spatial Annotations
Spatial annotations allow you to define map elements such as waypoints that can be referenced by missions and other features.
- Scope: Objects of this kind can only be defined for scope
robotortag. In the latter case, the tag must be an existing location in the account. - Kinds and types: Use
kind: SpatialAnnotation. Supportedspec.typevalues includewaypoint, but other types may be added in the future. The example below focuses onwaypoint.
Waypoint annotation
SpatialAnnotation (waypoint) config
apiVersion: v0.1
kind: SpatialAnnotation
metadata:
  id: nw-picking-5
  scope: tag/${ACCOUNT_ID}/${LOCATION_TAG_ID}
spec:
  data:
    theta: 1.5680526494979858
    x: -20.71269678140978
    y: -4.144237022384018
  frameId: map
  label: 'Picking station #5'
  type: waypoint
Fields
metadata.id: Identifier for the annotation within the location.metadata.scope: Must betag/<accountId>/<locationTagId>referencing an existing location tag.spec.frameId: Coordinate frame where the annotation is defined (typicallymap).spec.label: Human-readable name of the annotation.spec.type: Must bewaypointfor waypoint annotations.spec.data.x: X position in meters.spec.data.y: Y position in meters.spec.data.theta: Heading in radians.spec.properties(optional): Arbitrary key/value object for custom metadata.
Configuring: Traffic Management
Managing robots fleets, in particular with multiple and heterogeneous robots in a same location require effective orchestration of their work. One aspect of this orchestration is controlling where and how robots can navigate in their location, and if they should follow any traffic rules. InOrbit supports controlling traffic by defining Zones in a map, assign them traffic rules or implement your own custom logic and representation for them.
Note: This feature is only available to some Editions.
Traffic Zone Types
Traffic Zone Type config
apiVersion: v0.1
kind: TrafficZoneType
metadata:
  scope: account/<accountId>
  id: charging
spec:
  label: Charging Zone
  # Only one robot is allowed to enter this zone at a time, so we use "soz" (Single-Occupancy Zone)
  # traffic rule
  rules:
    - soz
    - type: nogo
      options:
        priorityTags:
          tagId: 10
  # Color for these zones will be green, except when state value is "occupied"
  style:
    color: "#66c2a5"
  conditionalStyle:
    occupied:
      color: "#e5c494"
  events:
    # Whenever a robot enters the zone, we want to execute an action on it. In this example,
    # turning on ambient lighting on the charging zone (identified by room001)
    - type: action
      actionId: turnOnLights
      targetId: room001
      event: onEnter
The TrafficZoneType kind is used to define the type of zones requiring traffic attention.
For example: parking or docking areas reserved for robots, areas with special traffic rules
such as a narrow alley where only one robot should be allowed at a time, or areas where robots
are not permitted to enter.
Zone Types can be assigned traffic rules, to enforce such behaviors. Currently,
only "nogo"
and "soz" (for Single-Occupancy Zone)
rules are implemented out of the box.
Contact support or your customer engineer for help to implement custom traffic rules.
By default, two TrafficZoneTypes are configured ("nogo" and "soz")
in all accounts; with these two rules for No-Go zones
and Single-Occupancy. Any number of user-defined zones can be configured.
All zone types can have different styles (color, transparency) to be visually distinguished
in the navigation maps.
They can also use different styles according to their internal state. In the example, a soz zone
defines a different color to use when its state has value "occupied", as defined in the
conditionalStyle section. The state is changed by traffic controllers ("free", "occupied")
and it can also be modified using
REST APIs.
TrafficZoneTypes are configured for "account" scope, ie. globally for all robots and locations.
Events. Zones can have events defined, that trigger when robots enter or leave the zone, when
the zone first become occupied by any robot, or when the last robot leaves. These are defined in
the events section.
The event value must be one of "onEnter", "onExit", "onEmpty" or "onOccupied"; and it
triggers a robot action (the only event type supported initially), which can be run on the robot that
initiated the event or in a different robot or device by using the targetId. The action actionId
must be configured in that robot.
For example, one might want a robot to slow down when entering a zone, by running a specific action
that configures its speed; or turn on/off ambient lighting while the robot is in the zone
for a vision-based robot navigation system to work properly.
Traffic Zones
Traffic Zone config
apiVersion: v0.1
kind: TrafficZone
metadata:
  scope: tag/<accountId>/<locationId>
  id: chargingZone001
spec:
  label: South-West Charger
  type: charging
  frameId: map
  geometry:
    # Polygon coordinates are normally obtained when drawing the zone in the app
    polygon:
      - x: 0
        y: 0
      - x: 1
        y: 0
      - x: 1
        y: 1
      - x: 0
        y: 1
    bufferDistance: 0.5 # (Optional) Defines a buffer distance for the zone
  events:
    # Individual zones also support events. This example would run "beepbeep" action on the
    # robot entering the zone
    - type: action
      actionId: beepbeep
      event: onEnter
The TrafficZone kind represents each of the zones defined in a location map.
They contain the actual coordinates of a polygon representing their two-dimensional area:
each of the elements of list polygon must be a point given as x and y coordinates.
Note that to assist in defining zones, it is advised to use the editor in Navigation map,
enabled by clicking Layers > Zones.
Zones are defined for physical spaces, which are identified by both the locationId (a tag)
and the frameId the robot is using in that location.
Each zone has a unique type, which must be one of the configured TrafficZoneTypes.
A zone will be represented in the map using the style given by its zone type.
It will also use any traffic rules defined in the type.
Note that zones can be useful even if their type has no traffic rules assigned to them, in multiple ways:
- By changing its visual representation when the zone is free or it contains robots, it can assist operators monitoring the fleet to be aware of their presence.
- They allow defining custom behaviors for robots and their missions, by using functions to
query about zone states and presence of robots.
See expression language. For example, a mission step might involve
waiting for another robot to enter or leave a zone, using an expression such as:
isRobotInZone('dropZone') and not isZoneOccupied('armReachArea')" - Through the REST API, it is possible to create integrations with external fleet managers, warehouse management systems or other tools; querying the state of zones and modifying them to also impact robot behaviors.
Zones can also be assigned events invidually. Events are described in the TrafficZoneType
section. When any zone event occurs, both the triggers defined in the TrafficZone and those
in its TrafficZoneType are executed.
If the user wants to detect or stop robots before they enter the defined zone geometry, the zone can be configured
to emit onEnter events when the robot approaches but has not yet entered the zone.
The property bufferDistance can define an area around the defined polygon so that onEnter events trigger
when a robot (or part of it) is less than bufferDistance meters from the actual zone polygon.
Robots selector
Zones can optionally include a robots selector to restrict which robots are considered when evaluating a zone (for example, for occupancy and events). If omitted, the zone applies to all robots in the location.
The selector supports matching by robot id, a list of ids, tags (required tags), tags to ignore, and a name pattern. All provided conditions are ANDed.
Robots selector schema
spec:
  robots:
    robot:
      robotId: "<robotId>"            # optional
      robotIds: ["<id1>", "<id2>"]    # optional
      tagIds: ["<tag1>", "<tag2>"]    # optional; robot must contain all
      ignoreTagIds: ["<tagX>"]        # optional; exclude robots with any of these tags
      namePattern: "<regex>"          # optional;  regex
Traffic Zone with robots selector
apiVersion: v0.1
kind: TrafficZone
metadata:
  scope: tag/<accountId>/<locationId>
  id: chargingZone001
spec:
  label: South-West Charger
  type: charging
  frameId: map
  robots:
    robot:
      tagIds: ["cleanerRobots"]
      ignoreTagIds: ["maintenance"]
      namePattern: "vacuum.*"
  geometry:
    polygon:
      - { x: 0, y: 0 }
      - { x: 1, y: 0 }
      - { x: 1, y: 1 }
      - { x: 0, y: 1 }
Notes:
- All selector conditions are required simultaneously (logical AND).
Robot-based Customization
InOrbit gives robot end-users and also robot developers the ability to mix and match robots from different vendors and operate them through a single platform.
Monitoring and operating diverse types of robots effectively requires focusing on each robot’s characteristics: some may use different status and incident configurations; some will have configured different sets of actions for operators or different data sources and cameras to observe. This also applies to robot models from the same maker; with added sensors to monitor or capabilities that reflect in operator actions.
InOrbit offers different approaches to customize the app’s user interface so that it presents the relevant information according to each robot type – or to the right situation.
Dashboards
Most elements presented in the user interface are customizable through Dashboards’ configuration Enter Settings > Robot Data > Dashboards, and customize your dashboards to your preference by adding sections or widgets with the information relevant to your scenario.
In order to customize further details not always available in the Settings screens, and also for better control of configurations as your scenario and complexity of configuration grows over time, we highly recommend using Configuration as Code through are Config APIs.
Using the DashboardDefinition kind you can define dashboards to suit your exact needs. It is recommended to start through the Settings interface for an initial version, then export its configuration. Using the InOrbit CLI: inorbit get config –kind DashboardDefinition –yaml > my_dashboards.yaml and continue by tweaking parameters in that file, applying the changes every time: inorbit apply -f my_dashboards.yaml.
It is also recommended to use version control (such as a Git repository) to control your configuration versions as well.
In the next sections, we assume a basic understanding of Config API, the InOrbit CLI and an initial working version of dashboards with a pre-created YAML file.
Conditional Dashboards
Conditional widget example
apiVersion: v0.1
kind: DashboardDefinition
metadata:
  id: <DASHBOARD-ID>
  scope: account/<ACCOUNT-ID>
spec:
  label: Robot
  sections:
  - label: Hardware
    scope: robot
    widgets:
    - label: Health
      type: vitals
      config:
        dataSources: ["cpu", "memory", "battery1-volt", "battery1-temp"]
    - label: Dual Battery
      type: vitals
      conditional:
        tags:
          - dualBattery
      config:
        dataSources: ["battery2-volt", "battery2-temp"]
Dashboards can be configured with variants to display the most relevant information and the appropriate actions for each robot type – or robot situation. In some cases, widgets only make sense to a specific robot configuration or state.
Dashboards sections and widgets can be configured to be displayed only when the selected robots has a specific tag. As tags can be used to represent robot types or hardware models, versions, customers, locations, modes, etc., this approach allows adapting dashboards to most "conditional" situations.
In this simplified example, creating a dashboard with one Robot section. (To create a more realistic dashboard, it is recommended to export an existing dashboard configuration and fine-tune it using code as displayed here). This section has two widgets. The first ("Health") is displayed for all robots. The second widget ("Dual Battery") only appears when the robot has a tag "dualBattery", and displays some data sources indicating battery temperature and voltage.
The same conditional property shown here in widgets can be applied to sections, making visibility of an entire section conditional to robot properties.
Navigation View
Tag-based configuration tweaks for Navigation widget
apiVersion: v0.1
kind: Preferences
metadata:
  id: all
  scope: tag/<ACCOUNT-ID>/<ROBOT-TAG>
spec:
  navigationWidget:
    actions:
      - cancel-navigation-action-id
    panels:
      teleop: false
The Navigation dashboard is core to many robots operations, allowing it to monitor the robot position within a map, its surroundings as detected by sensors (e.g. lidars), planned navigation, cameras, etc. It also allows operating the robot: Sending the robot to a waypoint, tele-operating it to adjust its position, relocalize it, execute arbitrary actions, etc.
Some of that functionality may not apply to some robots. In this case, it is preferable to hide some elements from the display to un-clutter the user interface, as well as to simplify operators' work.
The elements presented for navigation are set using Preferences Config API kind, and apply to all Navigation dashboards. These options: * The list of actions to offer the operator to execute (displayed on the toolbar). These must be pre-configured actions (Settings > Insights > Actions, or ActionDefinition kind in Config API). * Displaying (or not) certain panels on screen. For example, omit cameras if the robot does not have one, or the teleo-operation controls if they do not apply to a robot type (devices fixed to the ground, or large machines where manual teleoperation is disallowed).
The simple example in the sidebar demonstrates how to hide the teleop controls and offer quick access to execute a specific action.
Note that this Preference configuration is applied only for a specific tag, so it only applies to robots with that tag. Combining multiple of these configurations, the Navigation view can be customized to different types of robots.
For a full reference on dashboards, sections and widgets, check Dashboards Config API.
Time Capsule
Time Capsule configuration example
apiVersion: v0.1
kind: DashboardDefinition
metadata:
  id: <DASHBOARD-ID>
  scope: account/<ACCOUNT-ID>
spec:
  label: Time Capsule
  sections:
  - label: Time Capsule
    scope: timeCapsule
    conditional:
      tags:
        - cleanerRobots
    withControlWidget: true
    widgets:
      - label: Map
        type: timeCapsuleMap
        config: {}
        layout: { "chroma": true, "grid": 8, "height": 2 }
      - type: group
        label: ""
        layout: { "grid": 8, "height": 2 }
        widgets:
        - config: {}
          label: Robot Log
          layout: { "chroma": true, "grid": 12, "height": "300px" }
          type: timeCapsuleAuditLogs
        - type: chart
          label: Timeline
          config:
            chartType: linechart
            dataSources:
            - id: cpuLoadPercentage
              label: CPU
            - id: ramUsagePercentage
              label: RAM
          layout: { "chroma": true, "grid": 12, "height": "120px" }
        - type: chart
          label: Sensors
          config:
            chartType: linechart
            dataSources:
            - id: cpuLoadPercentage
              label: CPU
            - id: ramUsagePercentage
              label: RAM
          layout: { "chroma": true, "grid": 12, "height": "120px" }
InOrbit’s Time Capsule is a powerful tool to analyze past events to perform Root Cause Analysis on incidents, analyze missions performance, etc. As debugging may focus on internal robots’ details, it may require fine tuning specific to robot types. Creating different conditional Time Capsules is very useful to customize the experience based on the robot type; see example below.
Additionally, assembling the ideal Time Capsule configuration may require multiple widgets and a complex layout, to all work in sync (displaying the same past timestamp to rewind through an event). The Settings interface offers to select through a few layout presets, but the Configuration API allows for fine tuning of these layouts. The code below also presents a (complex) layout not available in the defaults, as an idea for customizing your dashboards.
Note that this rather simplified (yet long) example is conditional and would display the entire Time Capsule section to only a set of robot types (tagged "cleanerRobots"). It also makes use of a group, to stack some widgets to the right of a large map, and fine-tunes their individual layout to adjust the height of each widget: using numbers to represent "rows", or quoted strings for exact heights in pixels. Layout properties (width, height) are inspired by the classic 12-column web layout system. Note that we included the layouts using JSON syntax simply to use less code lines (JSON is part of YAML format).
Fleet View
The Fleet Status Widget is the main access point to your robots fleet and can display a combination of high-level information on the fleet status as well as detailed robots statuses allowing to drill down on specific information.
Robots will normally have several statuses defined (as for example battery level, ROS status, temperature sensors) which may be at "OK", "Warning" or "Error" levels. Some statuses (as well as their associated data sources) may make sense to parts of the fleet and not others. Normally, when the fleet combines different robot types, there will exist different StatusDefinition configurations defined at tag levels, to apply to different sub-fleets. When this happens, the Fleet View widget will adapt its appearance to display detailed or summarized information according to whether the fleet (or groups) in display is "heterogeneous", ie. if the robots status configurations are different across a displayed group of robots. This is another form of customizing the displayed information, adapting to robots’ configurations.
Summary
We reviewed different ways to customize the InOrbit user interface to present the most relevant information for each robot, which may change according to the robot type, configuration or its current state. Access to some of these advanced features is given through the Config APIs, which can also bring advantages from doing Configuration Management on your configuration files.
For more information, questions and feedback contact support@inorbit.ai.
Concepts
Expressions Language
The following examples assume some data sources and tags exist for the robots; the data source ids are given as example and should be self-explanatory.
Example: Determines the maximum value of a "signal strength" data source and takes it logarithmic value. This value could be compared using
ABOVEorBELOWrules in aStatusDefinition.
log10(maxValue('signalStrength'), 600))
Example: Detect a failed docking attempt. If given as part of a status rule and it is configured with a
{ sustainedForSeconds: 180 }, it would trigger if the robot has not docked after three minutes of changing its program to"DOCKING"
getValue('currentProgram')=='DOCKING' and not getValue('is_charging')
Example: Robot stopped while on a mission. As part of a status rule it triggers if a robot has not left a 2-meter square for three minutes, signaling it is unable to navigate through its path.
hasTag("prod") and getValue('currentProgram')=="DELIVERY" and visitedAreaSide(180)<2
Example: This example expands on the 'DataSourceDefinition' example
"motorTemperatureId"above. The 'StatusDefinition' example below shows how absent motor temperature readings could generate an alert after 120 seconds:
[
  {
    "metadata": {
    "scope": "account",
    "id": "motorTemperatureId"
  },
    "apiVersion": "v0.1",
    "kind": "StatusDefinition",
    "spec": {
      "calculated": {
        "expression": "getValueAgeMs(motorTemperatureId)>=120000"
       },
      "rules": [
         {
           "function": "EQUALS",
           "params": "true",
           "status": "WARNING"
         }
      ]
    }
  }
]
Example: Given an
eventJSON object attribute, if the robot is seeing one of the configured landmarks, this expression would take a"lobby"value, if not it default to the"current_floor"data source instead. Note that the expression works in multiple lines or a single line.
event = getValue(event);
landmarks = event and event.navigation ? event.navigation.visible_landmarks : [];
("L00" in landmarks) or ("FRONT_DOOR" in landmarks) ? "lobby" : getValue("current_floor")
Certain parts of InOrbit's advanced configuration allow definining values (such as conditions) from a combination of comparisons, boolean logic, and functions using robot's information (data sources, tags, localization data). See for example StatusDefinitions.
This language will look familiar to anyone versed in programming languages, and closely resembles JavaScript language syntax.
Its very rich expressivity allows defining complex expressions, only limited to the data available about the robot in InOrbit platform. It creates a very powerful tool for expressing robots conditions for each domain's business rules.
Here we briefly describe its syntax and operations.
- Constants includes numbers in decimal notation, strings enclosed in single or double quotes, the boolean values
falseandtrueandnull. - Arithmetic and logical operations include
+,-,*(multiplication),/(division),%(remainder),^(exponentiation) as well asnot,and,or(boolean operators). - Comparison includes
==,!==,>=,<=,>and<(equals, not equals, etc.) - All sub-expressions can be grouped using parenthesis
(and)to make precedence explicit. - Arrays (list of values) are accessed through subscript operator
[], e.g.a[3]. They can be concatenated with||. - Functions calls are denoted using their name, followed by parenthesis with optionally argument values separated by commas. For example,
minValue("battery", 30). - Variables can be assigned with
=to reuse values; and these assignments are separated using the;delimiter. For examplex=3; y=4; sqrt(x*x + y*y).
Spaces are optional, operator precedence and associativity follow usual arithmetic conventions. More formally, precedence is as follows:
(...): groupingf(),a[i]: Function calls, array indexing (left-associative)^: Exponentiation (right-associative)+,-,not,sqrtunary operators (full list below)*,/,%: Product, division and remained+,-,||: Addition and subtraction (arithmetic) and concatenation (strings and lists)==,!=,>=,<=,>,<,in: Comparison operators and inclusion operator (x in ameans "is elementxincluded in lista)and: Logical ANDor: Logical ORx ? y : z: Ternary conditional: ifxthenyelsez.=: Variable assignment;: Expression separator
The unary operators include in addition to + and - (sign), many algebra and trigonometry functions:
abs(absolute value), -ceil,sign,round,trunc(sign, rounding and truncation),sqrtandcbrt(square and cubic root)ln,log10,log2(logarithms)sin,cos,tan,tanh,asin,acos,atan,atanh(trigonometric functions)length(array length)
All of these are unary operators, although its equivalent function syntax is usually found, e.g. acos(x).
Additionally, robot-specific functions allow evaluating conditions on robot-reported data:
Language functions
get(<value>, <field>, <defaultValue>): Given an object, it returns the value of one of its fields. Normally used for robot attributes of type "JSON". If<value>is not an object, or it does not containt the given<field>, it returns<defaultValue>(which is optional, when omitted it is assumed to benull).
Robot Data Functions
getValue(<ds>): The current value of the robot data source identified by<ds>.getValueAgeMs(<ds>): The age of the robot data source identified by<ds>in milliseconds; defined as the time that has passed since this data source value was last sent by the robot.minValue(<ds>, <secs>),maxValue(<ds>, <secs>),meanValue(<ds>, <secs>): Aggregation operators to obtain the minimum (resp. maximum, average) value of the data source identified by<ds>during the last N seconds.hasTag(<tag>): Determines if a robot contains a tag -- See CollectionsdistinctValues(<ds>, <seconds>)andsustainedValue(<ds>, <seconds>): Determine all unique values of a given source<ds>for the last<seconds>time window. The functiondistinctValuesreturns all these values in a list (see array operators above). The functionsustainedValuecan be used to know if the data source has reported one unique value over that time: in that case it returns this value; otherwise it returnsnull.
Both functions require enabling storage of values history. Refer toDataSourceDefinitionin StatusDefinitions.
Localization Data Functions
visitedAreaDiagonal(<seconds>): The diagonal length of the smallest bounding box containing all of the robot positions during the last N seconds. It allows determining if the robot is actually moving; beyond its linear or angular distance (e.g. the robot can be moving in circles attempting to go around an obstacle).visitedAreaSide(<seconds>): Similar tovisitedAreaDiagonal, except it reports the largest side of the smallest bounding box containing all of the robot positions during the last N seconds.match(<regularExpression>, <variable>): Performs regular expression matching. The result isnullif there is no match, or a list of strings when matched (which can also be used as "true" value for a boolean expression). This list contains the entire match as first element, and any captured groups as subsequent elements. Regular expressions follow ECMASCRIPT language specification, refer to this cheatsheet. Character classes, grouping and other regular expression features are supported. For example, using regular expressions to test for a data source and extract part of its value: Usingx = getValue("dsId"); m = match("NAVIGATE-(.*)", x); m ? m[1] : "no goal"will test the value of a data sourcedsIdagainst the regular expressionNAVIGATE-(.*). Let's say the value of this data source is"NAVIGATE-ELEVATOR", then functionmatch()returns["NAVIGATE-ELEVATOR", "ELEVATOR"], and the ternary conditional?will take valuem[1]which is"ELEVATOR".inRectangleArea(x0, y0,f x1, y1, frameId): Returns a boolean value indicating if the robot current pose lies within the rectangle determined by any two opposite corners(x0, y0)and(x1, y1). The function is only calculated if the robot reports a pose, and the givenframeIdmatches. The last argumentframeIdis optional, and the coordinates would match the robot pose from any coordinate frame (this is not recommended, but it makes testing easier when only one frame is in use). This function can be used to define simple rules based on robots position in a map, such as no-go or exclusion zones.
Traffic Management Functions
When using Traffic Management,
expressions can use functions to query about the state of TrafficZones.
isRobotInZone(<zoneId>, [<locationId>]): Determines if the current robot (where the expression is being evaluated) is currently inside the zonezoneId. This identifier is normally sufficient to identify the zone, which must be defined in the robot's current location. Optionally thelocationId(a tag) can also be provided. As some expressions (e.g. in Mission Definitions or Zone Events) can be evaluated in arbitrary robots, this function can also be used to ask if any robot is currently inside a configured zone.isZoneOccupied(<zoneId>, [<locationId>]): Tells if there is currently at least one robot in a given zone. The zone is identified in the same way as inisRobotInZone. For example, a mission step mightwaitUntila zone becomes empty (for example to drop some cargo or to move on a narrow area).
Maps
There is a difference between real world coordinates and image coordinates on a screen. InOrbit represents the map coordinate frame using the right hand rule as the convention for coordinate axes and rotations. This takes inspiration from ROS and a more detailed explanation can be found in REP-103. Specifically, translation is X => forward/backward, Y => left/right, Z => up/down.
The 2D Map representations on InOrbit are a projection of the space looking down from above which means that in 2D, the direction in which the coordinates increase are X => right, Y => Up.
For images, the direction in which the coordinates increase are X => right, Y => down. (0,0) is in the upper left corner.
An image on your computer will most likely display the normal image coordinates system (Y increases as you move to the bottom). Maps on the InOrbit Platform are displayed using world-coordinates, so Y increases as you move to the top.
InOrbit's REST APIs and MQTT API abstractions provide a formatVersion field that controls how an uploaded map image is interpreted relative to InOrbit's world coordinate system.
formatVersion: 1
The map image provided is interpreted in world coordinates. Therefore, to correctly align these images with the InOrbit world coordinate system, the map is vertically flipped before uploading.formatVersion: 2
The map image is already aligned with InOrbit world coordinates and is rendered without applying any flip.