Mission Tracking Tutorial
InOrbit can keep track of missions and use this information as part of your understanding of robot activity (observability/operation) and to understand overall performance and areas of improvement (optimization).
In this tutorial we describe step by step how to configure Mission Tracking using InOrbit's CLI, run your first robot mission and examine the results from InOrbit.
Note: the tutorial below assumes that your account has access to Mission Tracking features, which are not available in every InOrbit Edition. Please contact support@inorbit.ai for more information.
Step 1: Identify what a mission is for your fleet
Robot missions vary considerably across applications, and could involve picking a specific item, scanning an aisle for inventory, or cleaning an area, as examples. They represent the work the robot does, and thus what your company or your customers are counting on when investing in robots.
The first step to set up Mission Tracking is to identify what represents a mission to your fleet (or part of it), from start to finish. You can take a look at the Mission Tracking documentation to explore the different data types supported to describe a mission.
Step 2: API vs. derived, which one to use?
Mission data can be reported explicitly through APIs (e.g., via JSON objects), or inferred by the mission tracking feature, from robot Data Sources. Check the documentation to understand which matches your use case best.
In the following section we’ll be configuring Mission Tracking and running missions for each case.
Step 3: Set up Mission Tracking widgets
Independently of the path you use to publish mission updates, visualizing Mission Tracking on InOrbit control requires configuring the corresponding widgets and/or dashboards.
- Adding a Mission Tracking widget to a dashboard will allow you to get real time updates for missions on a selected robot or the entire fleet. Go to Settings > Dashboards and select the dashboard and section where you want to add it; then click the
+to add a new widget and selectMissions. - For a more complete, fleet-wise, visualization go to Settings > Dashboards, create a new dashboard and add a new section of type
Mission. The Mission Tracking dashboard will display past missions and KPIs at fleet level by default and at tag or robot level upon configuring them.
Check the documentation for more details on each.
It is also possible to query the status of a given mission using the Mission Tracking API.
Step 4: Configure and run missions
There are different alternatives to transmit Missions data. We will focus on two different approaches sending data from InOrbit's Agent: "API" and "inferred".
API
It is possible to perform Missions API calls from the agent by publishing data with appropriate (JSON) payloads in the form the Mission Tracking API accepts. Here we describe its configuration and execution.
Step 1: Configure Mission Tracking
Using the Configuration API, create a Data Source (called missionTrackingJSON in this tutorial) for the mission updates that your robot will publish and link it to the Mission Tracking configuration. Make sure that the Data Source is defined as type: json as that will allow parsing the data accordingly.
Mission Tracking configuration
  kind: DataSourceDefinition
  apiVersion: v0.1
  metadata:
    scope: "account/YOUR_ACCOUNT_ID"
    id: missionTrackingAPI
  spec:
    label: Mission Tracking JSON
    timeline: {}
    type: json
    source:
      keyValue:
        key: missionTrackingJSON
  ---
  kind: MissionTracking
  apiVersion: v0.1
  metadata:
    scope: "account/YOUR_ACCOUNT_ID"
    id: all
  spec:
    processingType:
    - api
    attributes:
      missionTrackingAPI:
      - type: missionApi
Step 2: publish data
There are different paths to publish key-value updates from the agent depending on your robot setup:
For non-ROS robots with a C++ API, you can use the sendKeyValue method from the Robot SDK.
For ROS based robots, this can be published directly to
inorbit/custom_data/0(ROS 1) orinorbit/custom_data(ROS 2). Other custom topics can be used as well but this is not yet configurable through configuration APIs. Please contact support@inorbit.ai for more information. Here’s a ROS 1 rosbag which has an example of a delivery robot running a successful mission.
The next steps are valid for any of the cases listed above.
Start a mission by publishing new data with the missionTrackingJSON key. Make sure to set the
stateaccordingly (e.g.Scheduled).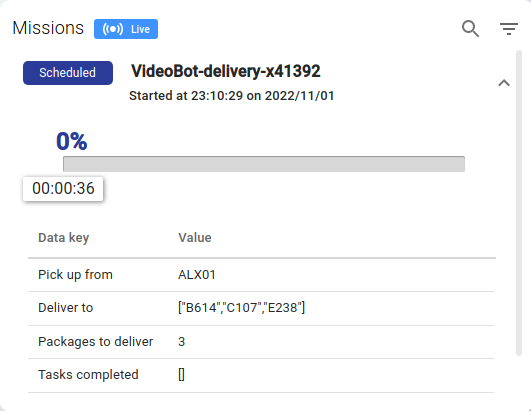
For this example, the command published is:
rostopic pub /inorbit/custom_data/0 std_msgs/String "data: 'missionTrackingJSON={\"missionId\":\"delivery-x41392\", \"state\": \"Scheduled\", \"completedPercent\": 0, \"inProgress\": true, \"data\": {\"Pick up from\":\"ALX01\",\"Deliver to\": [\"B614\", \"C107\", \"E238\"],\"Packages to deliver\": 3, \"Tasks completed\": []}}'" -1Once the mission is launched, you can publish updates of its progress through the same mechanism. Besides the default fields, you can also add metadata relevant to your mission using the
datafield.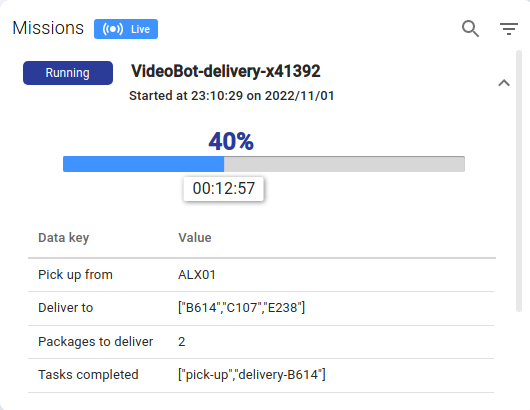
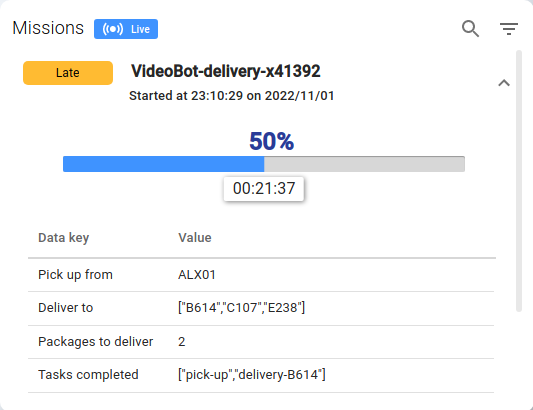
Use the
statefield to indicate when a mission is completed or should be canceled. In this example, the mission ends successfully so the final status is marked as OK.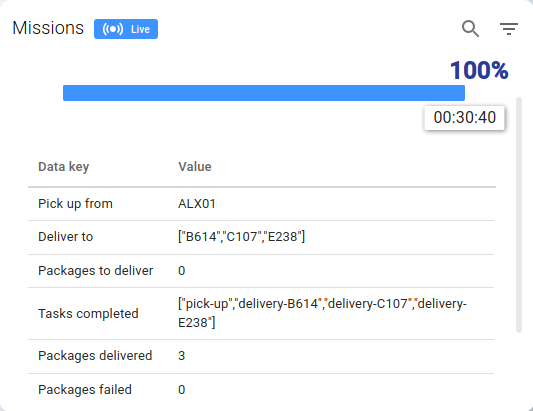

Sending mission updates through the Mission API
Another way to publish mission updates is to use the Missions API. In this case, no additional configuration is required. The request bodies for mission updates correspond to the examples given in the previous section.
Inferred missions
It is also possible to update mission data by deriving it from multiple Data Sources published by the robots.
The most important piece for this case is the attribute that you’ll define with
type: mission, as this will be used to mark the beginning and the end of a mission (check the documentation for more details). The mission trigger can be as simple as a Data Source indicating that the robot is in mission or not (Activity=Mission/Not in Mission or In Mission=true/false) or the type of action that it is performing (Dock, Delivery, CleanArea).
Once the mission trigger is defined, continue to find the rest of the data that you’d like to associate to a mission (state, progress, metadata, etc.).
Configure Mission Tracking
The important steps to merge all this information into Mission Tracking are:
Configure the Data Sources where your robot will be publishing mission updates (it’s possible that you already have configured some). You can do this on the UI (Settings > Data Sources) or through the Configuration APIs.
For this section we’ll use a cleaning robot as example, with the following data source ids:
areaCleanedareaToCleancleaningIdcleaningProductUsedcleaningResultcurrentTaskerrorsprogresswaterUsed
Data Sources configuration
  kind: DataSourceDefinition
  apiVersion: v0.1
  metadata:
  scope: "account/YOUR_ACCOUNT_ID"
  id: currentTask
  spec:
  label: Current task
  timeline: {}
  source:
    keyValue:
      key: current_task
  ---
  kind: DataSourceDefinition
  apiVersion: v0.1
  metadata:
  scope: "account/YOUR_ACCOUNT_ID"
  id: cleaningId
  spec:
  label: Cleaning ID
  timeline: {}
  source:
    keyValue:
      key: cleaning_id
  ---
  kind: DataSourceDefinition
  apiVersion: v0.1
  metadata:
  scope: "account/YOUR_ACCOUNT_ID"
  id: taskProgress
  spec:
  label: Task Progress
  timeline: {}
  source:
    keyValue:
      key: task_progress
  ---
  kind: DataSourceDefinition
  apiVersion: v0.1
  metadata:
  scope: "account/YOUR_ACCOUNT_ID"
  id: taskResult
  spec:
  label: Task result
  timeline: {}
  source:
    keyValue:
      key: task_result
  ---
  kind: DataSourceDefinition
  apiVersion: v0.1
  metadata:
  scope: "account/YOUR_ACCOUNT_ID"
  id: areaToClean
  spec:
  label: Area to clean
  timeline: {}
  source:
    keyValue:
      key: area_to_clean
  ---
  kind: DataSourceDefinition
  apiVersion: v0.1
  metadata:
  scope: "account/YOUR_ACCOUNT_ID"
  id: areaCleaned
  spec:
  label: Area cleaned
  timeline: {}
  source:
    keyValue:
      key: area_cleaned
  ---
  kind: DataSourceDefinition
  apiVersion: v0.1
  metadata:
  scope: "account/YOUR_ACCOUNT_ID"
  id: waterUsed
  spec:
  label: Water used (l)
  timeline: {}
  source:
    keyValue:
      key: water_used
  ---
  kind: DataSourceDefinition
  apiVersion: v0.1
  metadata:
  scope: "account/YOUR_ACCOUNT_ID"
  id: cleaningProductUsed
  spec:
  label: Cleaning product used (l)
  timeline: {}
  source:
    keyValue:
      key: cleaning_product_used
  ---
  kind: DataSourceDefinition
  apiVersion: v0.1
  metadata:
  scope: "account/YOUR_ACCOUNT_ID"
  id: errors
  spec:
  label: Errors
  timeline: {}
  source:
    keyValue:
      key: errors
You can check the data sources ids for your case using the CLI:
inorbit get config --kind DataSourceDefinitionFor ROS 1 environments, here’s a rosbag with a sample mission reporting this data as key-values.
Configure Mission Tracking to gather the information from these data sources.
Mission Tracking (derived) configuration
  kind: MissionTracking
  apiVersion: v0.1
  metadata:
    scope: "account/YOUR_ACCOUNT_ID"
    id: all
  spec:
    processingType:
    - derived
    attributes:
      currentTask:
      - type: mission
        values:
        - cleaning
        - docking
      cleaningId:
      - type: label
      progress:
      - type: percent
      taskResult:
      - type: data
        label: Task Result
      - type: state
      areaToClean:
      - type: data
        label: Area to clean
      areaCleaned:
      - type: data
        label: Area Cleaned
      waterUsed:
      - type: data
        label: Water used (l)
      cleaningProductUsed:
      - type: data
        label: Cleaning Product used (l)
      errors:
      - type: data
        label: Errors
Publish Mission data.
Publish mission updates from the agent
A new Mission will be initiated once you publish one of the values that the attribute of type mission expects (for our example, either cleaning or docking):

From this moment, all the updates received on the attributes configured above will be updated on the Mission Tracking widget:

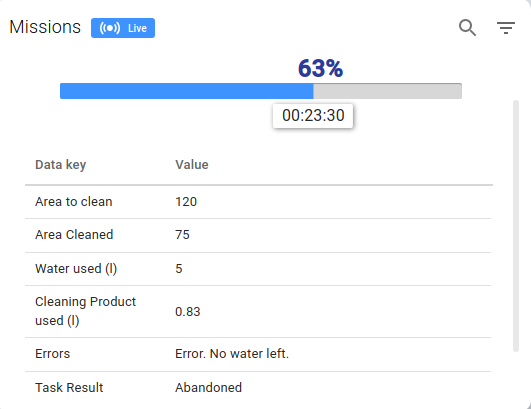
Until the Mission is defined as completed or, in our case, abandoned by setting the state as such: